Finding relationships in your data with embeddings
January 19, 2024 — 19 min read

With the world still working out the limits of LLMs and ever more powerful models being released each month, it’s a little hard to know where to begin.
Whether it’s summarising and generating text, building a useful chat assistant, or comparing the relatedness of strings with embeddings, almost all of this now can be done via a few simple API calls. It has never been easier to incorporate these new technologies into your own product.
Vector embeddings might sound daunting but they can power a whole host of features such as search, clustering, recommendations and anomaly detection.
Here, I'll dive into how we used embeddings to power one of our latest features, and highlight how you might use them to enable your own great features for your users, too.
Finding related incidents
Ever been in an incident that felt eerily familiar? Or tried debugging something for a while only to have a more tenured person suddenly join and immediately say “Oh, we had this last week, it’s 'X'.”
It was that feeling which sparked one of our latest projects finding related incidents—could we possibly act like that senior engineer who’s seen it all, just helpfully waiting to chip in and help?
The idea of acting as an artificial memory for you where we could quickly search through your previous incidents finding all the relevant information, learnings, and people right when you needed it.
After a little initial scoping we knew we needed the following:
- A concept of “relatedness”
- The ability to use any and all of our data as a link
- To search across all time quickly
- To update values in real-time
- To alter the data used for “relatedness” over time
Spotting relationships between data can be hard and this is even more true when your data contains text of differing lengths, customisable fields, and inputs from many different places.
See how we're transforming the way you learn from incidents with AI
Our initial experiments in linking together incident data began by trying out more traditional techniques such as TF-IDF (term frequency - inverse document frequency), table question answering, and other great resources available on huggingface.
We also looked at what other companies were doing in this space, and even spoke to a few of them to better understand the problems they tackled. It was during one of these chats that the idea of using embeddings came up.
What is an embedding?
With the recent rise of LLM’s you have may have heard of embeddings and vectors. But what are they? And how do they help us?
In a (very) simple sense, a vector embedding is an array of numbers that represents a model’s interpretation of a given block of text.
Whenever you write an important question into ChatGPT, it’s effectively turned into a vector of numbers:
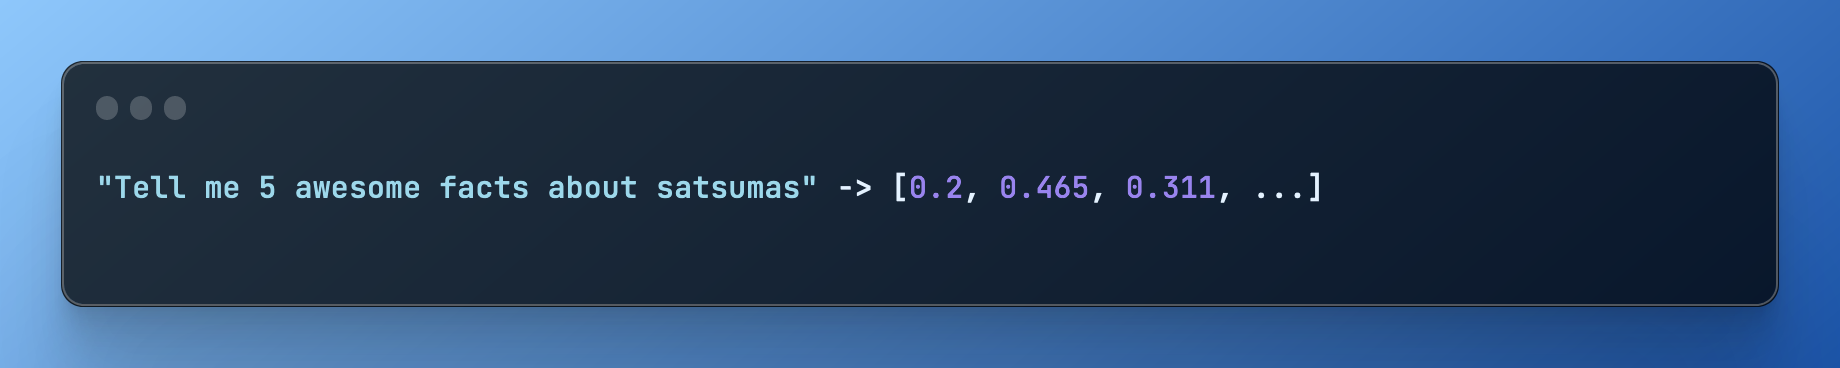
The model’s transformer takes your string of text and turns it into an array of values (the embedding). This is then passed on to later stages of the model and transformed into the text responses you'd normally expect. This is all incredibly simplified but rather than waiting for the final output, we're effectively grabbing this initial array of numbers before it does anything with it.
There are many different types of embeddings depending on whether you’re using words, sentences, whole documents, or even images. They also vary depending on what model you are using and how you wish to compare them.
For our use case, we wanted to keep things simple and hand in a block of text representing everything about an individual incident.
There’s an API for that
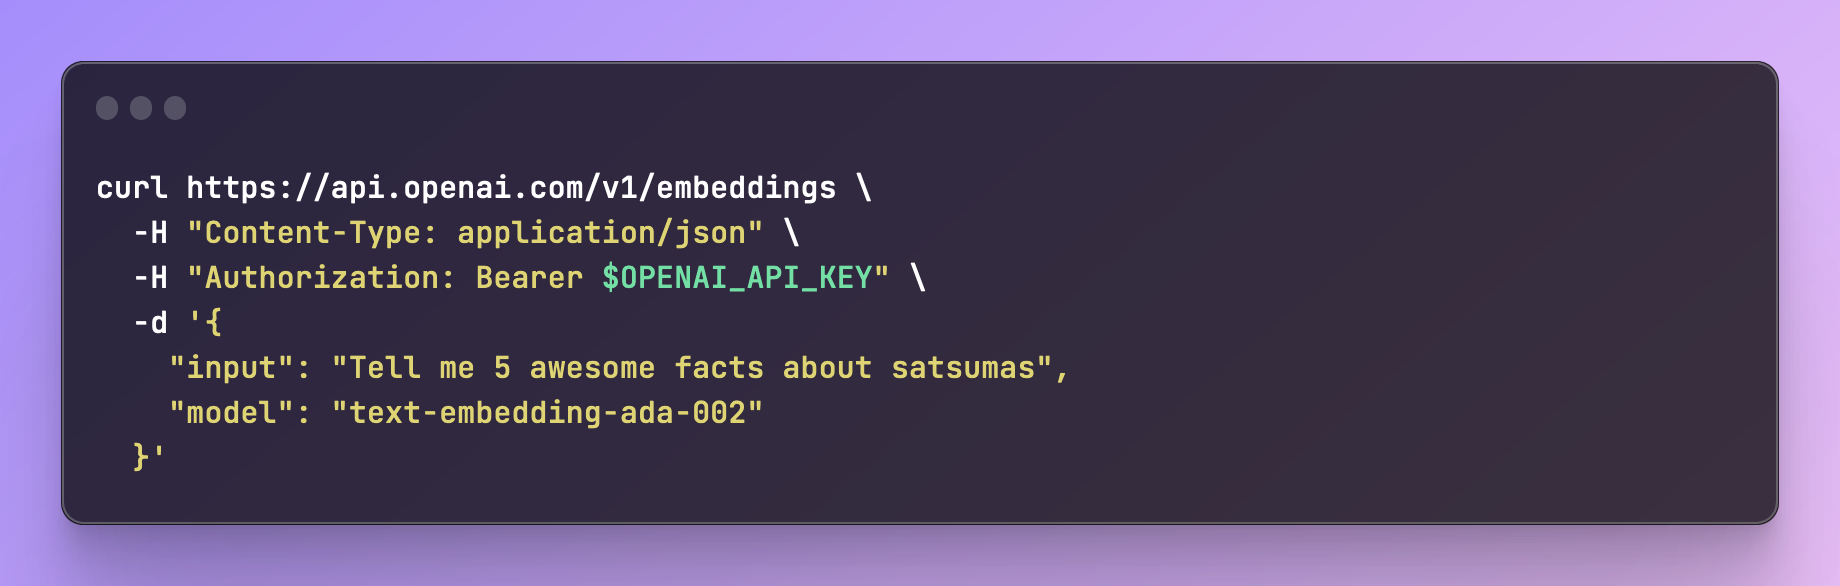
Luckily for us we don’t need to create or run our own models in order to generate embeddings. OpenAI offers an API for exactly that!
Getting an embedding for your content is as easy as firing off a single curl request:
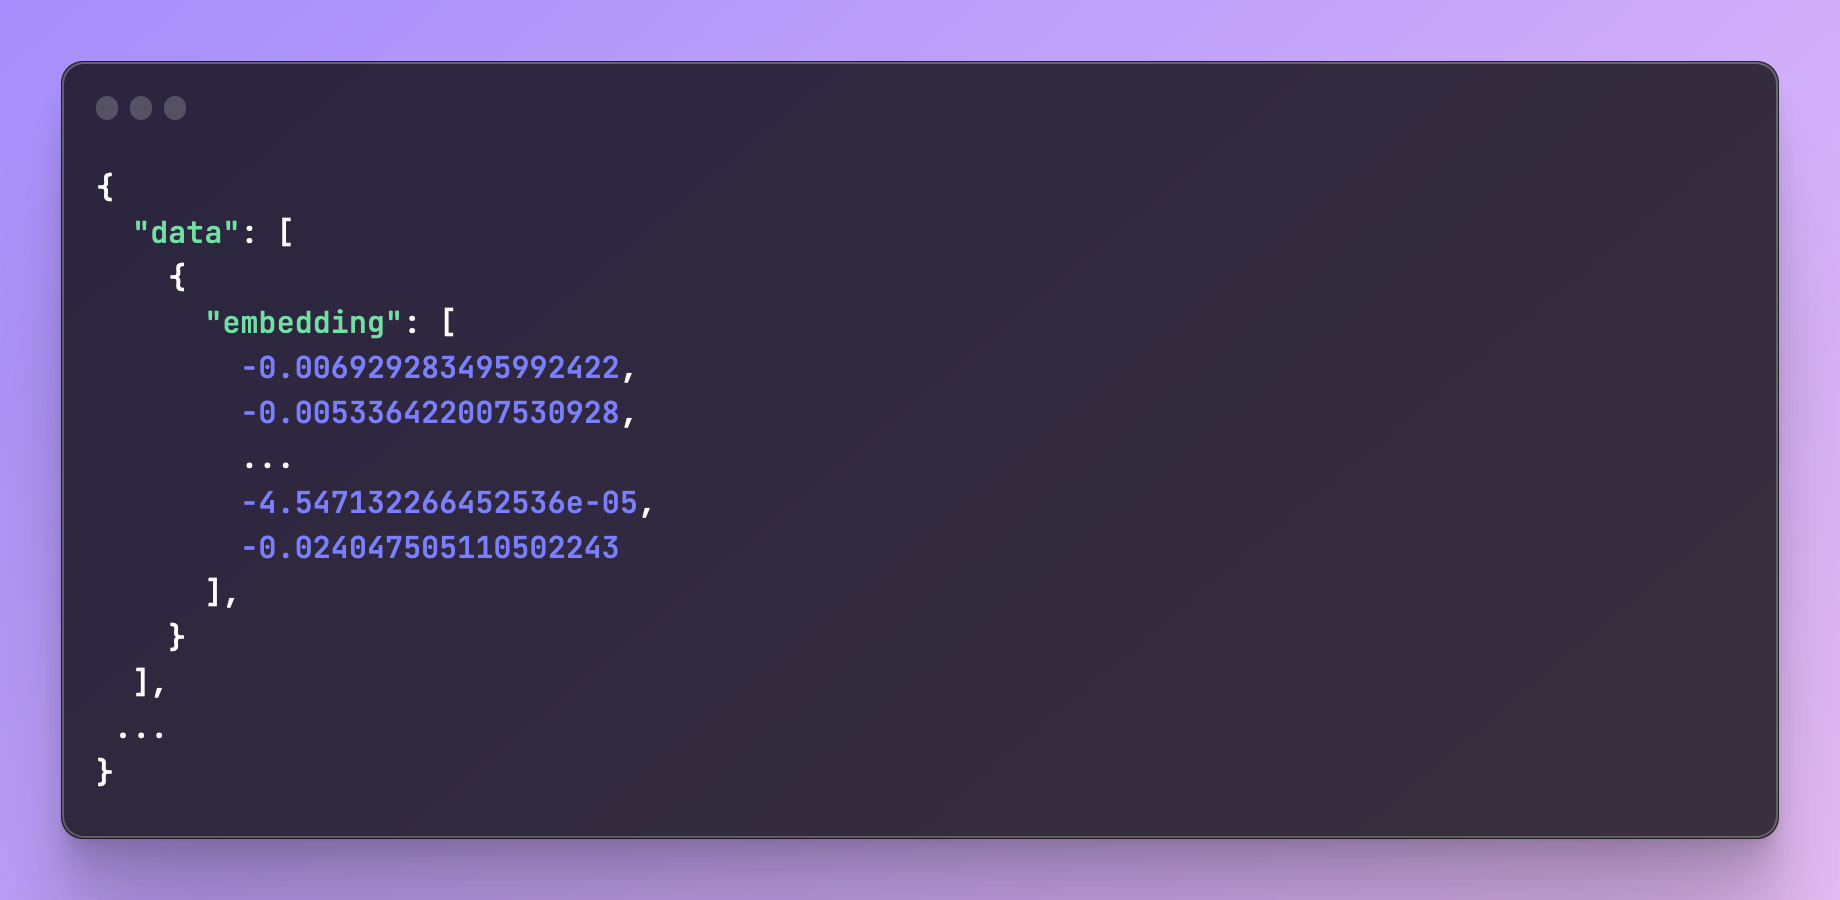
Within the response is the array of values you need:
Although, in theory, you could use any model available to generate embeddings, the recommendation from OpenAI is to use text-embedding-ada-002.
Note: the length of the vector you get back depends on the model. For ada-002 this is 1536 values (this becomes important later when creating your table to store these values).
Why is this useful?
So we have turned our text into an array of numbers—what on earth do we do with them?
A key feature of embeddings is that, given the same text input, a model should return an embedding containing the same array of values. You could think of this as a hashing function where you always get the same value for a given input.
With embeddings using LLMs, there is one major difference from hashing and this is where things get really magical.
Given a very conceptually similar input, the model will return an array of numbers that are measurably “close” to the first. You don’t need the strings to match exactly, we are literally able to compare apples to oranges (or even satsumas).
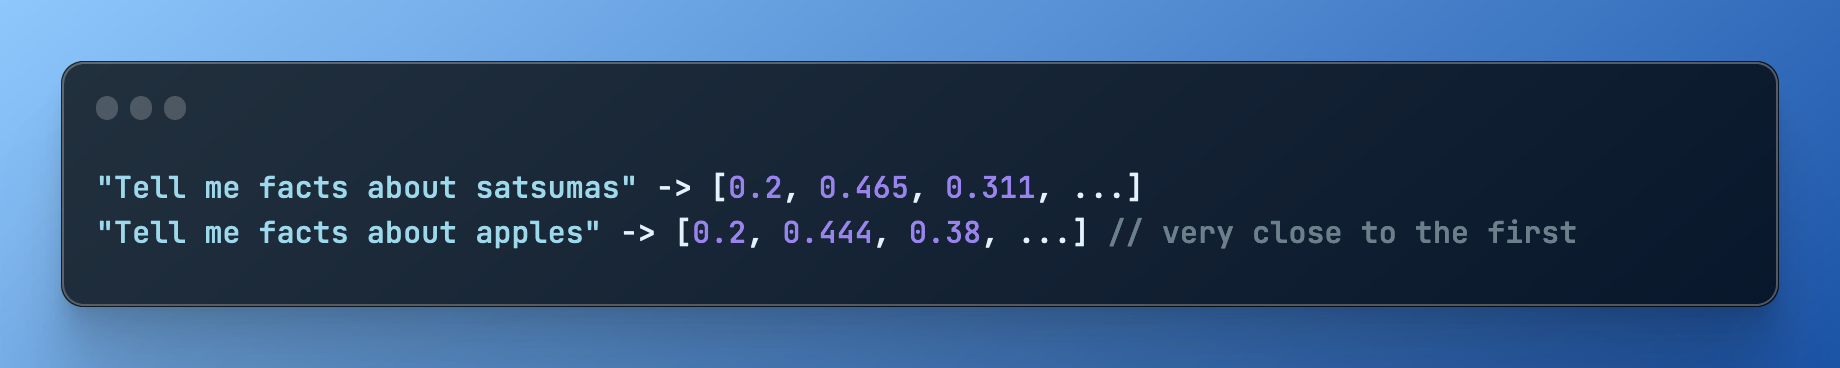
This closeness allows us to effectively work out how near one set of text is to another.
You can think of a vector as a set of coordinates in many dimensions. It’s possible to measure how close those coordinates are to another vector in several ways.
The method that OpenAI recommends is cosine similarity and effectively by doing so you get back a single number that you can use to rank and order similarity between incidents.
Building a useful prompt
We know we can generate vectors and compare them to one another. But what do we put into that vector? How do we structure the text?
Building the input or “prompt” for your embedding is one of the key steps where you are defining the formula for how two things will be compared. You’re describing the shape of something, so that when you come to look at it later you can tell a square is actually very similar to a rectangle, but it’s definitely not a circle.
One of the hardest parts of developing any AI feature is prompt-engineering. Often seemingly innocuous changes can have large impacts on results.
Generating inputs for embeddings is no different and it's important to think carefully about what information you include.
Our initial urge was to just throw every potential value we have into the prompt and use that. But given the wild array and variety of updates, summaries, custom fields, and chat messages, it was quickly apparent that including absolutely everything led to very inconsistent results.
Here’s what we learnt:
Be very selective in what you include
Things like timestamps will always be different, there’s no point in including them as they will only add noise to our result. Consider other fields—how likely is it that the values will be similar or related? How useful is that relationship?
As an example, if you search for a customer's name, is it useful to you to find other customers with very similar names? For example Bob and Rob, although having similar names, might have incredibly different incidents.
You should also ensure you don’t add fields that will never match, e.g., those that are random or unique (like a UUID) or even sequential like some IDs. Using these values, your embeddings can only get further apart as they are never the same and those fields will only ever make your matches worse.
Sort in a consistent manner
This may seem obvious but it’s easy to overlook. When comparing two sets of data it's important to ensure that arrays of values are sorted consistently whether this is alphabetically or by time.
Keep everything as plain as possible
In order to transform your text, models typically break strings down into tokens. Models typically have a limit on how many tokens then can accept or process at once.
By including only plain text rather than formats like json or markdown can help to save on token counts along with making it less likely that similarity is based on the templating or language used.
For example, we allow users to include rich text in their incident summaries, so before we include those we serialise them to a plain format.
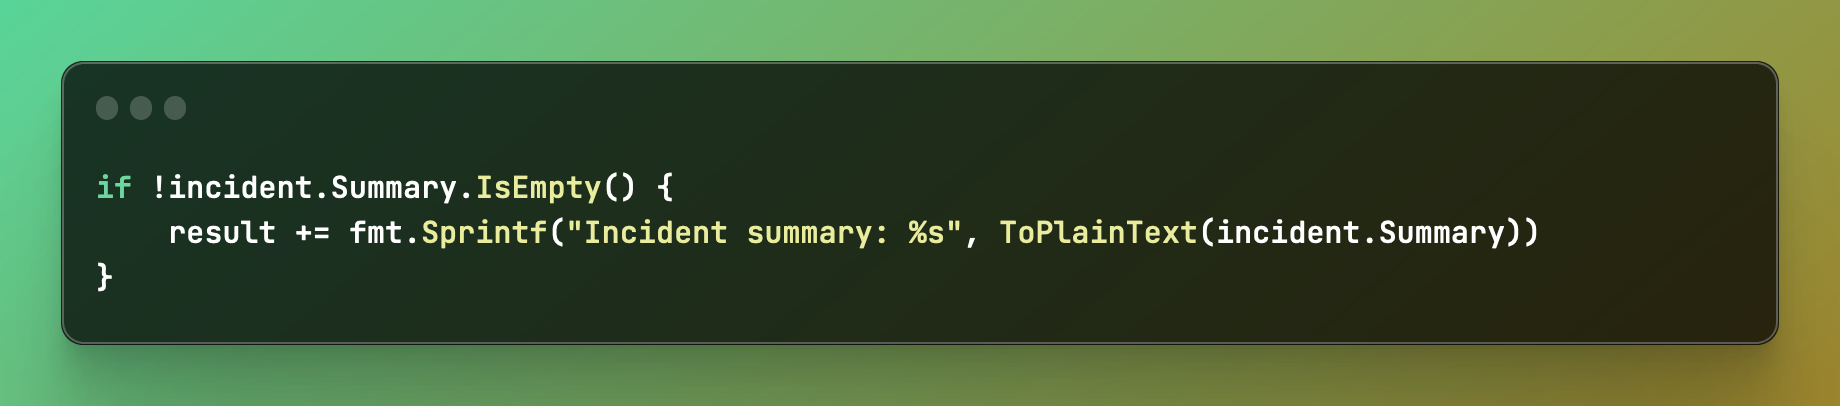
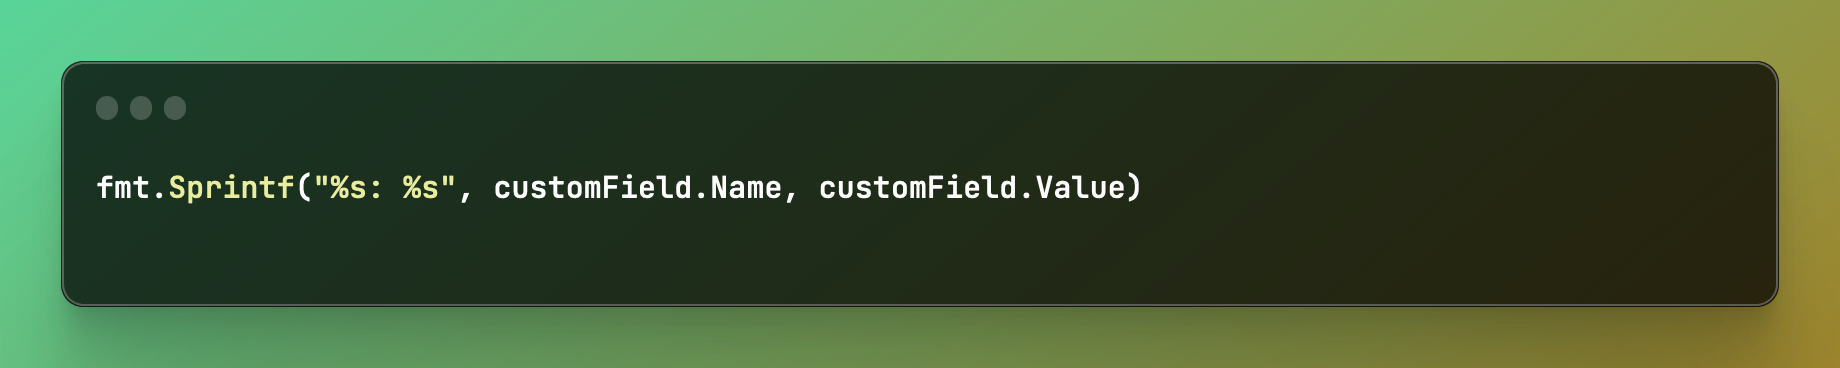
We also consistently map all types we expect to include into the same format each time. Here, we map a custom field a user has added into a label and it’s name:
We also include labels alongside any data, such as “summary” or “update,” or the name of a custom field. Again, all of this is to help the model associate data together and spot similarities in values.
Replace newlines with spaces
This wasn’t something we directly discovered but saw recommended in a number of places and even in official client libraries. Removing newlines and other special characters helped improve performance for some models. It may depend a little on the model you are using and how the text is broken up, but something to bear in mind!
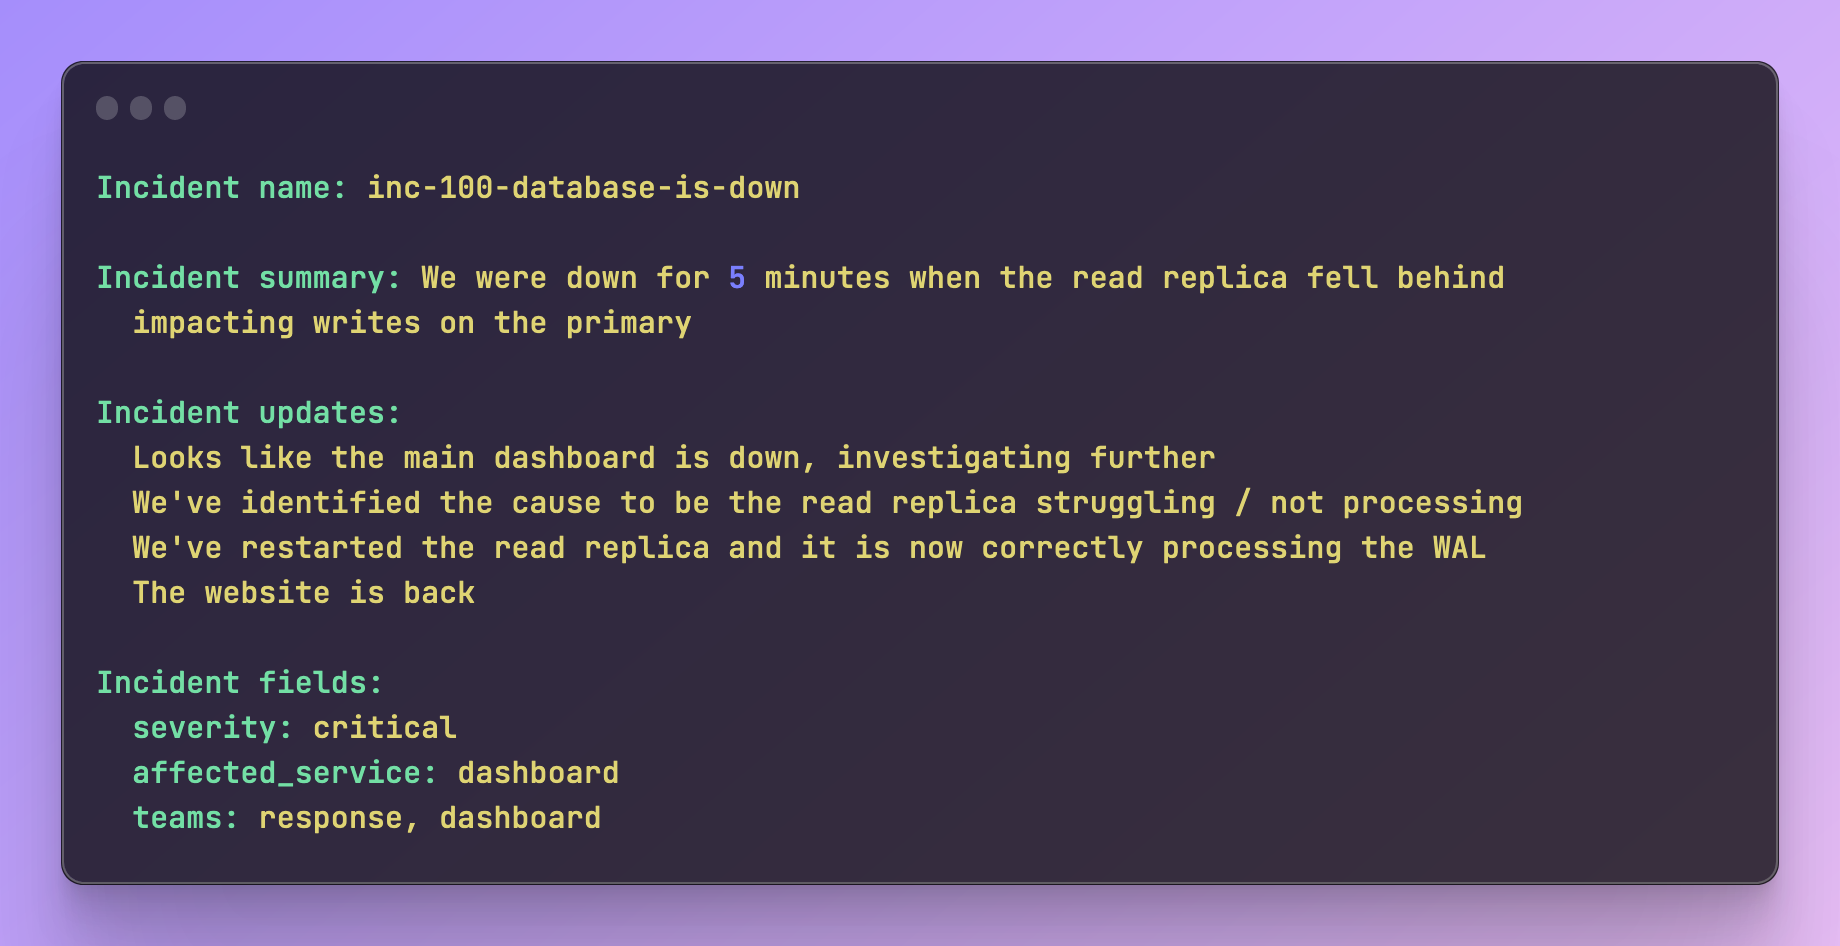
Example of our embedding prompt
All of this leads us to roughly the following shape of prompt that we hand in. There is typically a lot more content here but I’ve shortened it for brevity and added some newlines to space it out.
Measuring prompt effectiveness
We now had a working prompt and embeddings that we could query across. The next question was how to prove that it was right. How did we know that it was finding the right incidents that would be useful to users?
This is a common theme we had when working with AI so far in that we’ve found it particularly hard to easily measure improvements to prompts.
Often, you’re effectively working with a black box: prodding and poking it from outside. We have thousands of previous incidents to compare against one another and it would be incredibly tedious to try and check them all by hand.
Instead, we experimented using clustering methods such as k-means as a way of looking across our data and measuring how effective and similar our embeddings were.
This was a bit of a breakthrough and allowed us to more easily see how effectively we were “clumping” data together. This gave us more confidence when making any substantial changes to the prompt.
We knew we were really onto something when one of our most closely related incident clusters was from two incidents six months apart when our colleague Lucy accidentally got locked inside one of our meeting rooms.
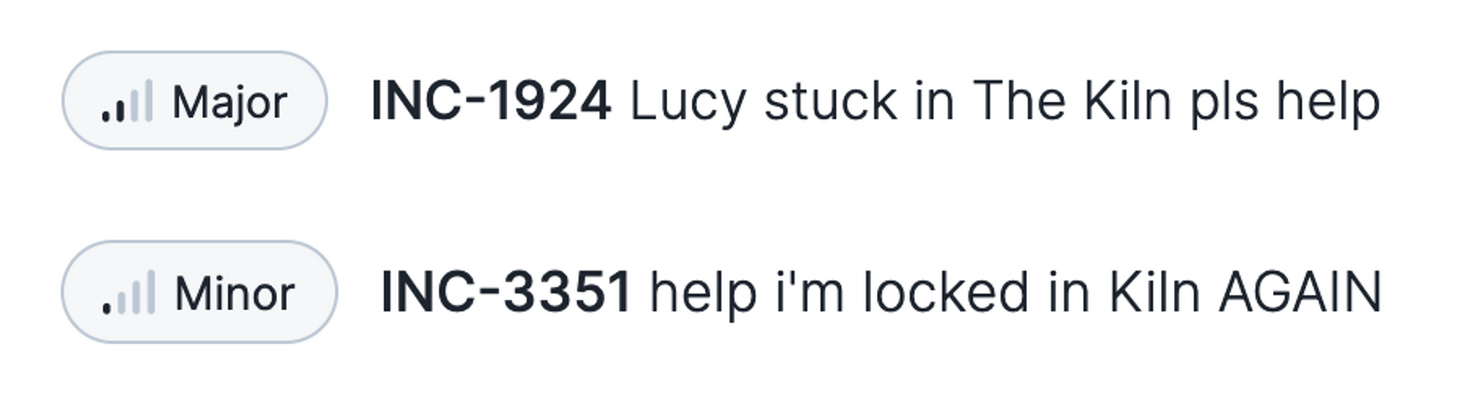
(it’s hard not to notice we downgraded the severity the second time, Sorry, Lucy)
Running in production
We were now happy that we could work out similar vectors in a meaningful way. We had an API to call, a prompt to build, and a means of comparing the results. So what was left to build?
To take this from experiment to product we needed:
- To create and store vector embeddings
- The ability to query across all embeddings for similarities
- Generate embeddings for previous incidents
- A process to create an embedding for an in-progress incident regularly
- To handle changing our prompt version such as adding additional data to it
- For it to be possible to use improved models as OpenAI released them
Storing embeddings
Often the biggest decision in a project like this is deciding the underlying technologies you will use to power things. In recent months there has been an explosion of new vector storage solutions and it can be difficult to decide quite which to use.
We love simplicity and pace here at incident.io and, as we use Postgres for our main application database, our first thought was to see if there was anything available that would allow us to use embeddings alongside the rest of our data.
Luckily it turned out there was! There is an extension available called pgvector which provides a new column type of vector. This extension and additional column type give us the means to query and compare vector values; it even provides specific index types to help improve performance.
Other things we considered:
- Accuracy: will we get perfect or approximate recall in our searches?
- Query patterns: will we be heavily writing or reading on this table?
- Data size: generating vectors for millions of rows might be a large additional amount of storage
Happy with our choices we created a new table to store our incident embeddings:

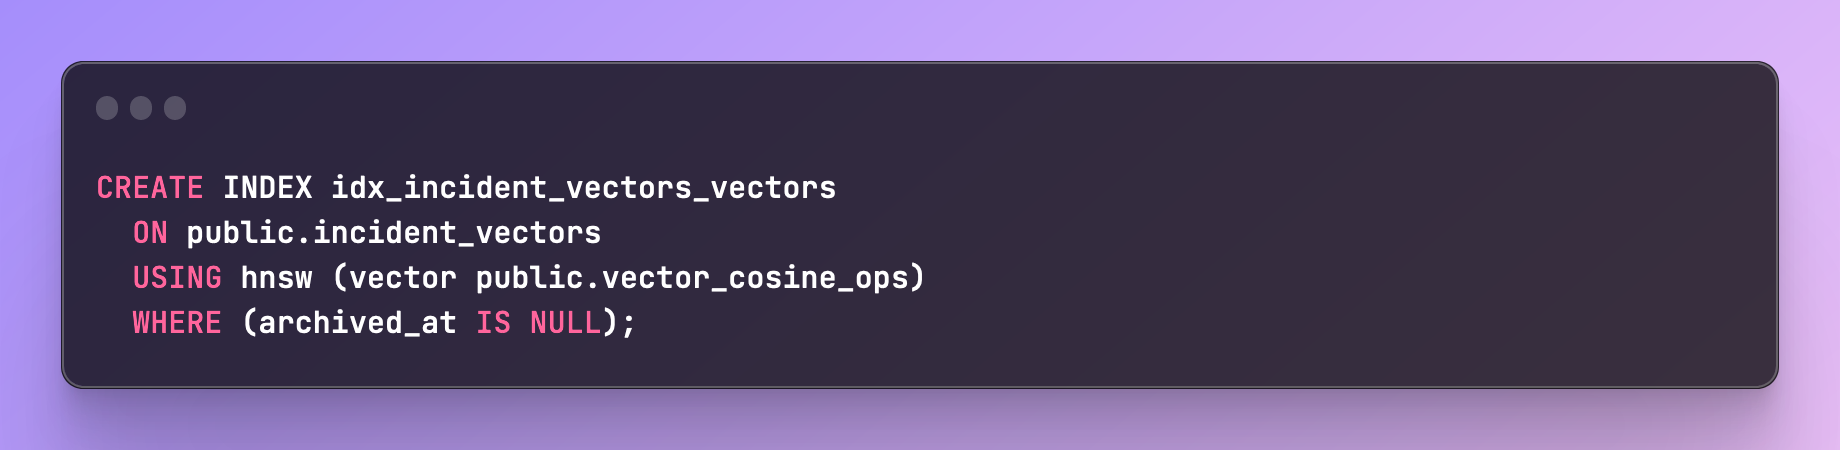
Knowing that we would need to search across a large number of rows and willing to sacrifice some accuracy, we looked at adding an index to the embeddings.
There are two main index types available for pgvector IVFFLAT and HNSW. The key difference being that you need to provide an initial set of training data to IVFFLAT whereas HNSW works straight out of the box.
For us, each organization might have drastically different types of incidents and content, so we wanted indexes to perform well right from the beginning. With that in mind, we chose HNSW as despite an increased build time and memory usage. This also provided improved query performance.
We added this index using cosine similarity:
With these in place, we can then query for incident vectors that were within a certain “closeness” or distance. Given a vector for our current incident, we can then search like so:
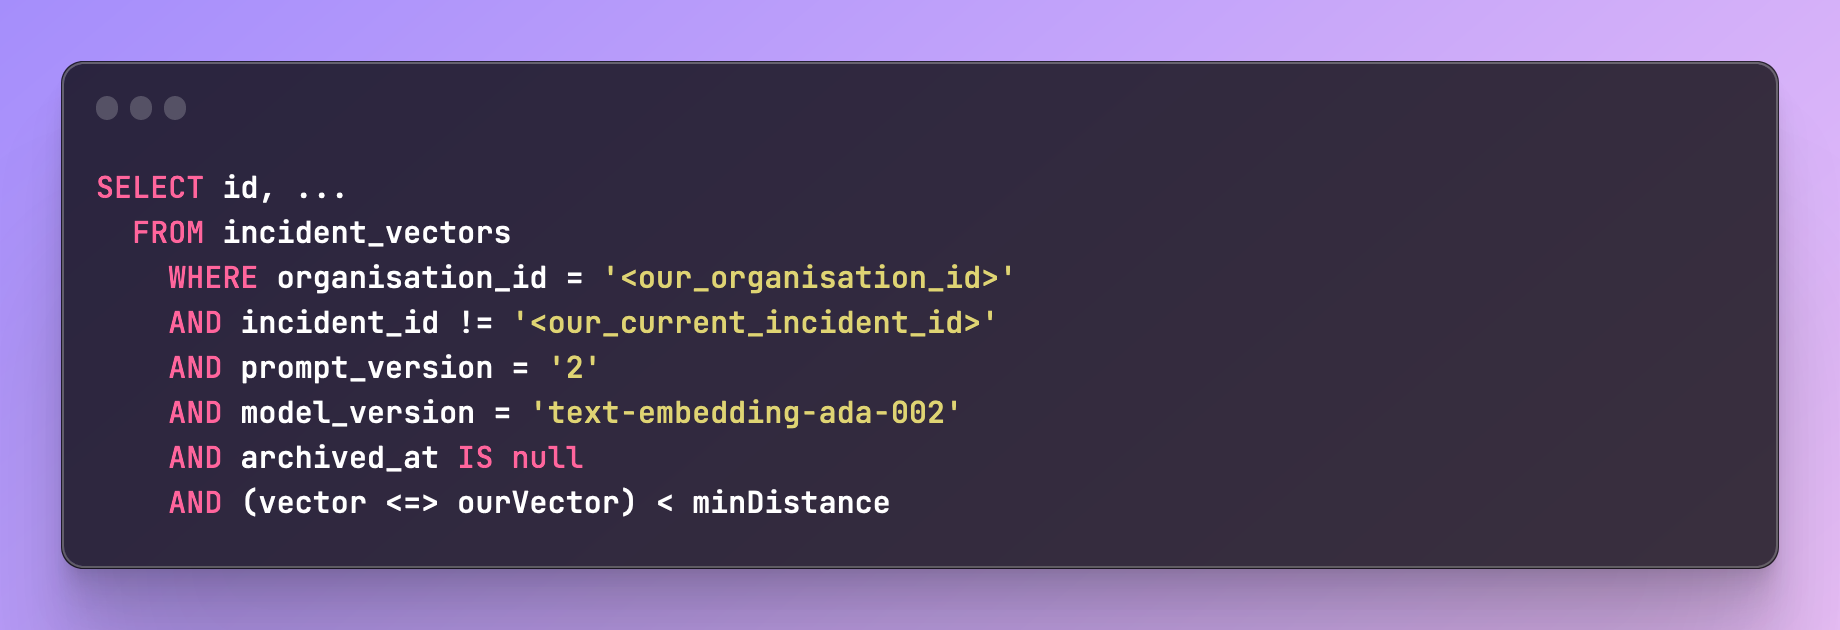
We want to make sure that we only suggest incidents that are relatively similar, we use minDistance to ensure we can control how many suggestions we're making.
Handling prompt and model changes
It's important to note that in the query above, we searched for similarity using not only the vector but also the model and the prompt version.
One model will generate completely different vectors to another, and more importantly, changing your prompt even slightly will lead to a different embedding for the same text.
The moment you change either of those things you must be able to backfill your data with the new embedding alongside serving potential matches using the old.
Making sure we maintained different versions of those things allowed us to do this and not have periods where we were providing incorrect suggestions, or no suggestions at all!
Backfilling existing incidents
Having an embedding generated for the current in-progress incident is not very useful by itself; to find related incidents you need to have a library of previous incident embeddings to compare against.
This is effectively like us going through the back catalog of data and tagging all the incidents your organization has experienced and making them comparable.
We wrote a simple background task that would go over every incident and, while respecting the OpenAI rate limits, generate a new embedding.
It was also important that it was repeatable (and fast enough to not cause issues) as due to the issues mentioned above whenever we change the prompt of the model we will need to repeat this step.
Updating an in-progress incident
An important factor for us when introducing this feature was that it should not be noisy in any way and should be accurate enough to not feel annoying.
Getting enough data to be able to provide a good prediction was key.
When an incident first starts it doesn’t contain much: perhaps an error is attached, a basic name, and a single message from the responder as they start to try and work out what’s going on.
If you looked for similar incidents at this moment, likely, you wouldn’t find anything useful, and worse the results might even be misleading.
Conversely, waiting until you have a large amount of content available to generate an embedding might mean the incident is already over and any potential usefulness of highlighting the similarity is wasted!
We decided to wait until we’ve seen a minimum level of activity, such as an update added and a few messages from users, and from then on we would trigger a task to generate a new embedding for each update and suggest any similarities we find to the user.
Fitting it all together
The final part of this project was hooking it all together and surfacing this information to users. Thanks to the power of embeddings we now can easily search and find related incidents quickly in the background.
When an incident is now updated, we now do the following:
- Emit an event saying that the incident has changed
- Subscribers for that event trigger our embedding code to talk to OpenAI and update the current incidents embedding
- Trigger an event saying that the embedding has changed
- Subscribers for that event now trigger a search for any closely related incidents
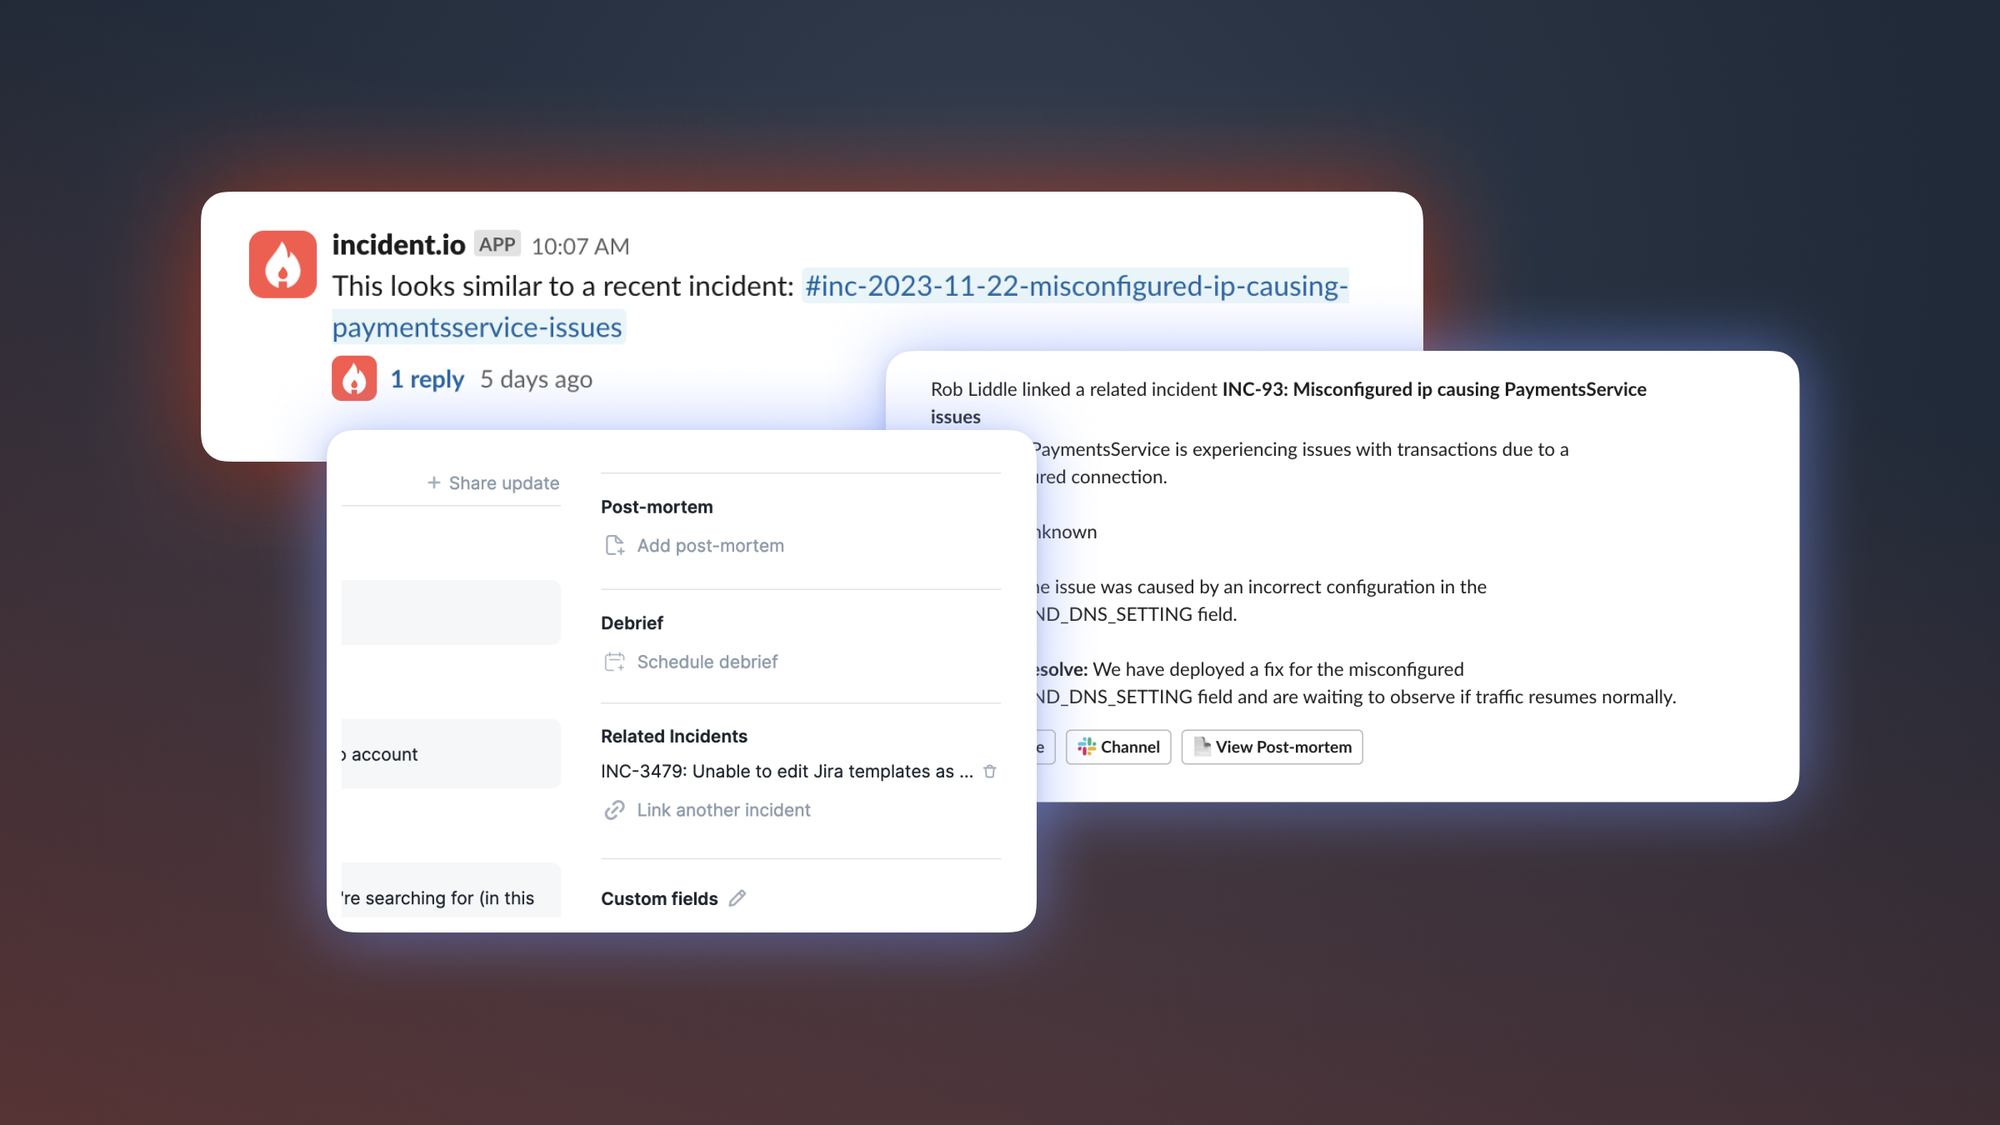
- If find a similar incident we post a message in the incidents channel notifying users that there might be a match
The message we post in the channel provides a little context and allows users to decide if they are relevant. They can either dismiss or accept. Once accepted, the incident forms a link back and forth between the two incidents allowing you to quickly access and related information you need!
The concept of linking incidents together proved so valuable we had customers asking if they could manually do it themselves, too, where perhaps we didn’t see the link or were manually imported.
We quickly added that as an option and can now use this additional data to perfect and improve our suggestions.
We’ll be continuing to tweak and improve our embeddings as we go and look at where else in the product we might be able to help users find the information they need quickly.
This has been a bit of a whirlwind tour of embeddings and how we incorporated them into one of our new features, but hopefully, it will help and inspire using them in your projects and products!
If you'd like to see all the AI features we've built, not just those using embeddings, check out this post.

Rob Liddle
Product Engineer
See related articles

We rebuilt our post-mortems from the ground up
Today we're launching our new post-mortems experience, and I want to walk you through what we've done and why.
 Pete Hamilton
March 17, 2026

Bloom filters: the niche trick behind a 16× faster API
This post is a deep dive into how we improved the P95 latency of an API endpoint from 5s to 0.3s using a niche little computer science trick called a bloom filter.
 Mike Fisher
November 14, 2025

My first three months at incident.io
Hear from Edd - one of our recent joiners in the On-Call team - how have they found their first three months and what's it been like working here.
 Edd Sowden
September 1, 2025