Building Workflows, Part 1 — Core concepts and the Workflow Builder
September 14, 2022 — 21 min read

At incident.io, we’re building tools to help people respond to incidents, often by automating their organisations’ process.
Much of this is powered by our Workflows product, which customers can use to achieve things like:
- Sending email updates about Major incidents to the executive team
- Escalate to Customer Success whenever an incident is customer facing
- When an incident is closed, Slack message the lead with a reminder to schedule a debrief
Workflows as a product feature are incredibly powerful, and we’re proud of the value they provide to our customers.
Behind-the-scenes, though, building something like workflows can be difficult.
We’re really happy with how we built our workflow engine, and this post – split over two parts – shares how we did it.
In part one, we start by explaining core workflow concepts that are used across the feature, and look at how the code is structured to make development easy. This is followed by a deep-dive into our Workflow Builder (the configuration UI) that shows how these concepts are exposed in APIs, and used to power the frontend.
Part two goes into detail about the workflow executor, showing how we listen for potential workflow triggers and if the conditions match, execute them. Finally, we reflect on whether we succeeded in our efforts to "slow down, to speed up!" in an evaluation of the project.
It will be interesting to anyone building workflow-like features into their own products, but also for anyone who enjoys seeing how engineering teams go about solving a product problem in a real business space, particularly in the context of a young start-up.
- Part 1
- Part 2
An overview
At its heart, a workflow can be seen as an implementation of:
When X happens, if Y, do Z
Our workflow implementation breaks this structure into several key concepts:
- “When X happens” is what we call a trigger, where a trigger might be “an incident has been created”
- “if Y” is a set of conditions which apply to details associated with the trigger, such as “is Severity > Critical”
- “do Z” is a list of steps, such as “Send Slack message” or “Escalate to PagerDuty”
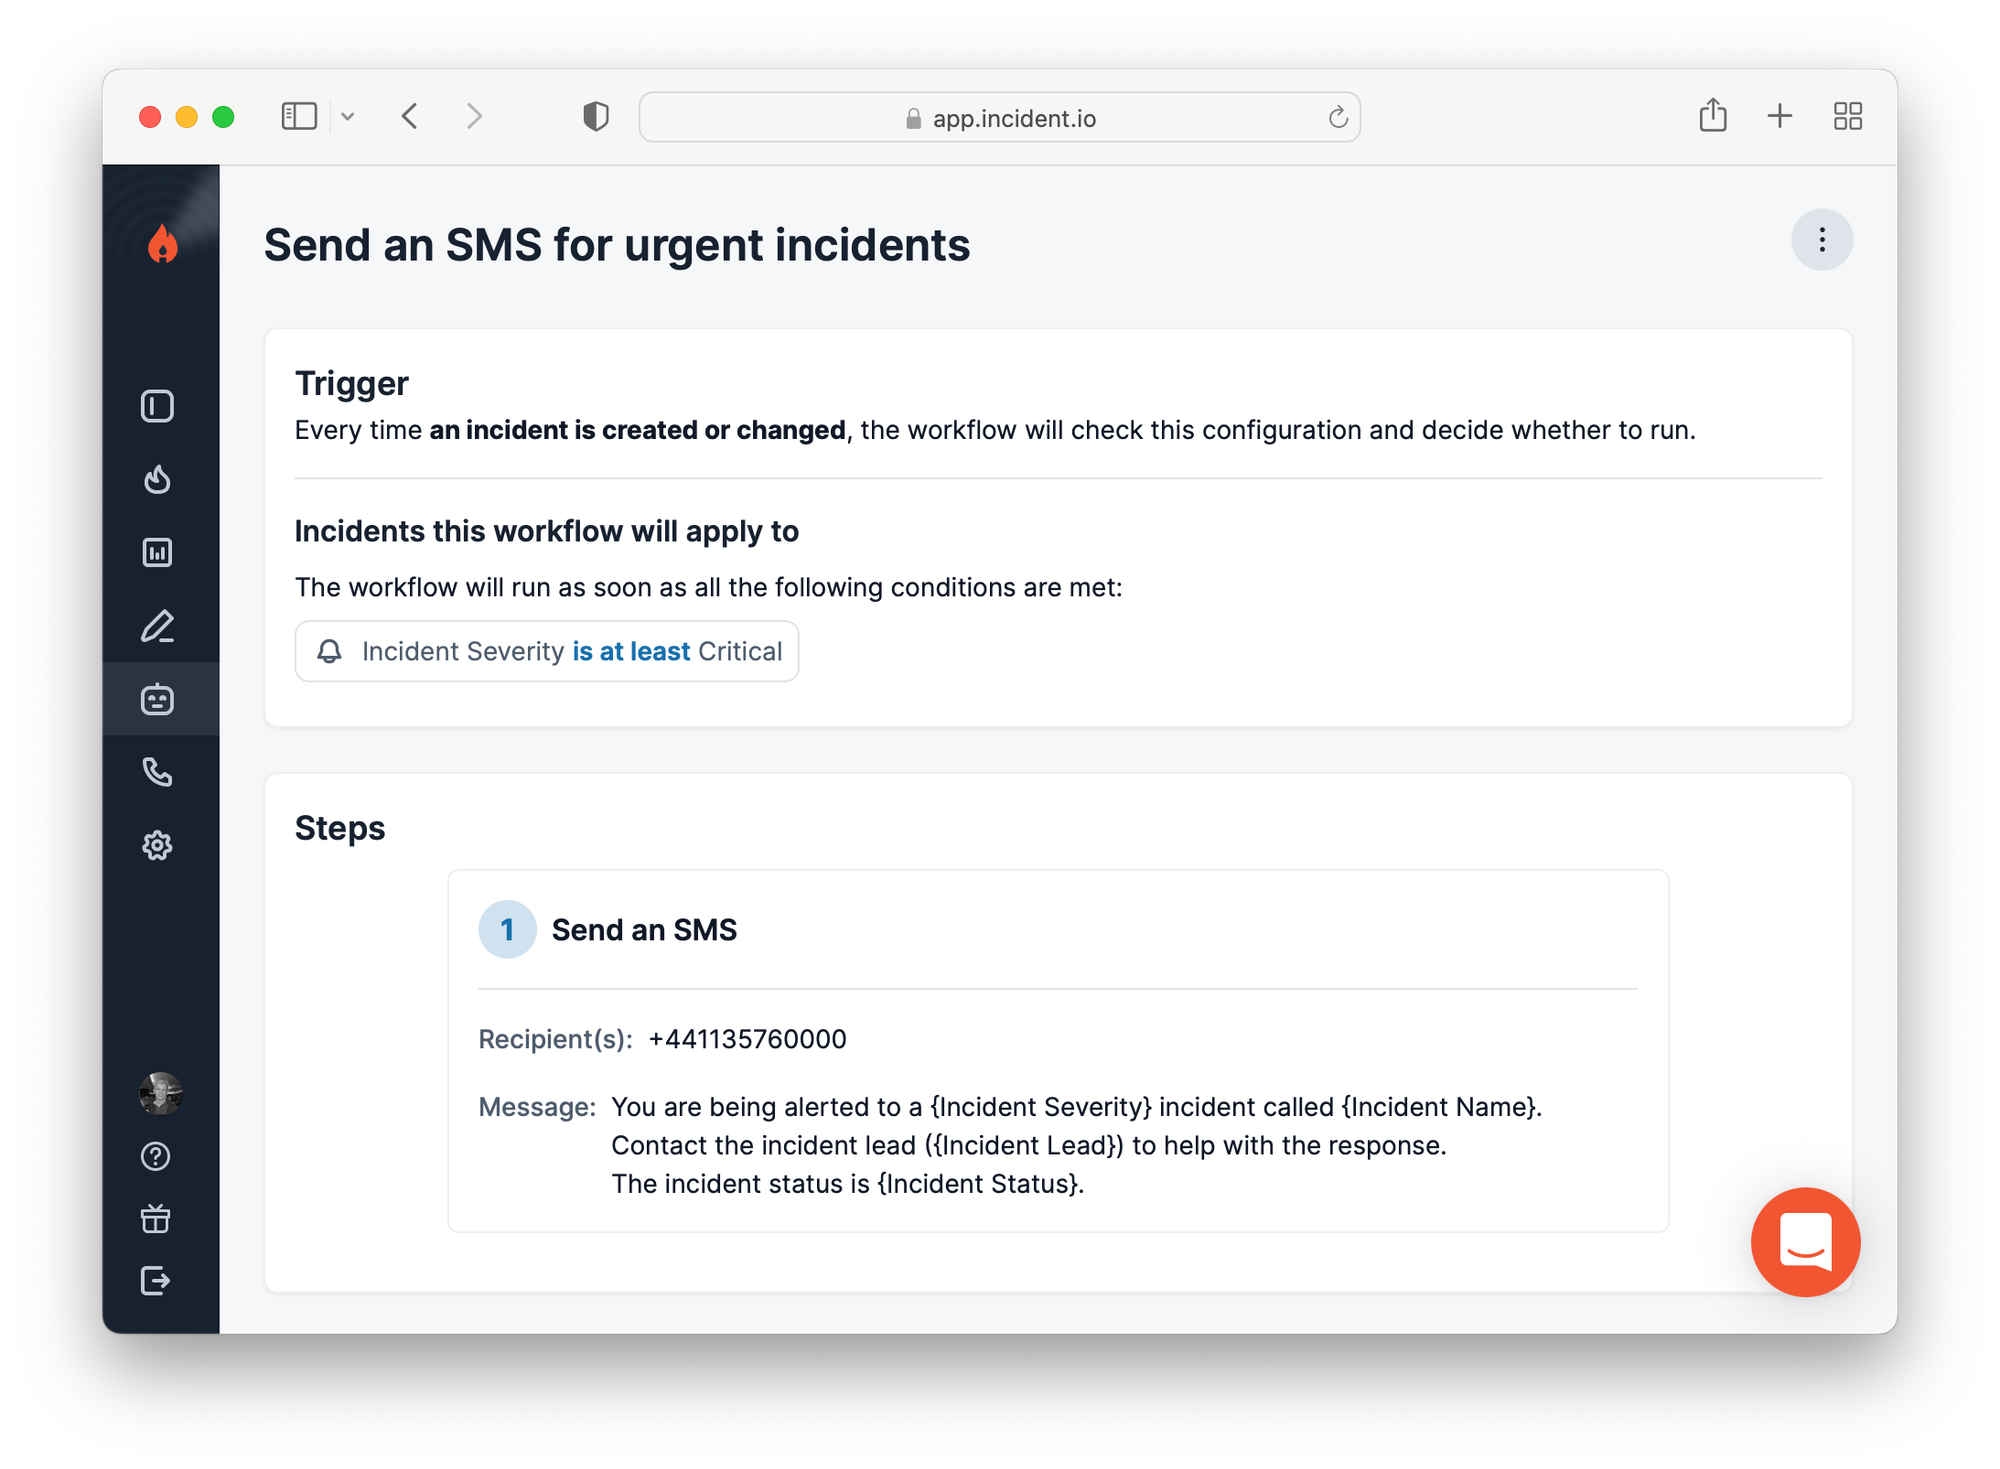
Customers configure workflows from our dashboard Workflow Builder, where they configure the trigger, its conditions, and any steps to run.
An example workflow with an “incident updated” trigger, conditions on the severity being at least Critical, and a step to send an SMS about the incident looks like this:
At a high level, workflows have two sides to the implementation:
- Building workflow configuration using resources, conditions and workflow steps
- Execution of workflows in response to triggers
Both sides share common implementation components, but we’ll explain each side separately, unveiling the common parts as we go.
Core workflow concepts
In the overview, we explained that a workflow is like an if condition in a computer program.
The workflow engine and executor we’ve built is best thought of exactly like this: a small and simple programming language, custom built to:
- Easily represent the entities workflows interact with (an incident, or Slack channel)
- Statically type those entities to help validate workflows, and evolve their structure safely
- Allow reflection of the functions (steps) and types (resources) to power the workflow builder, which can be seen as an IDE for the workflow language
These goals can be derived from the specific challenge of building a flexible workflow engine with a no-code frontend, and one where we care deeply about the robustness of workflows people create with us: people care, after all, about their incident process being reliable!
In the analogy of workflows as a programming language, we introduce a few concepts:
- Resources represent the variable types available in the workflow program
- Steps are functions that receive instantiated resources and execute code with them
- Like many programming languages, we have the concept of a scope, which is a collection of named resource instances that we call ‘references’
- Triggers, which are lifecycle events that can trigger workflows, build a scope that can be checked against workflows conditions, and provide resource values to the workflow steps
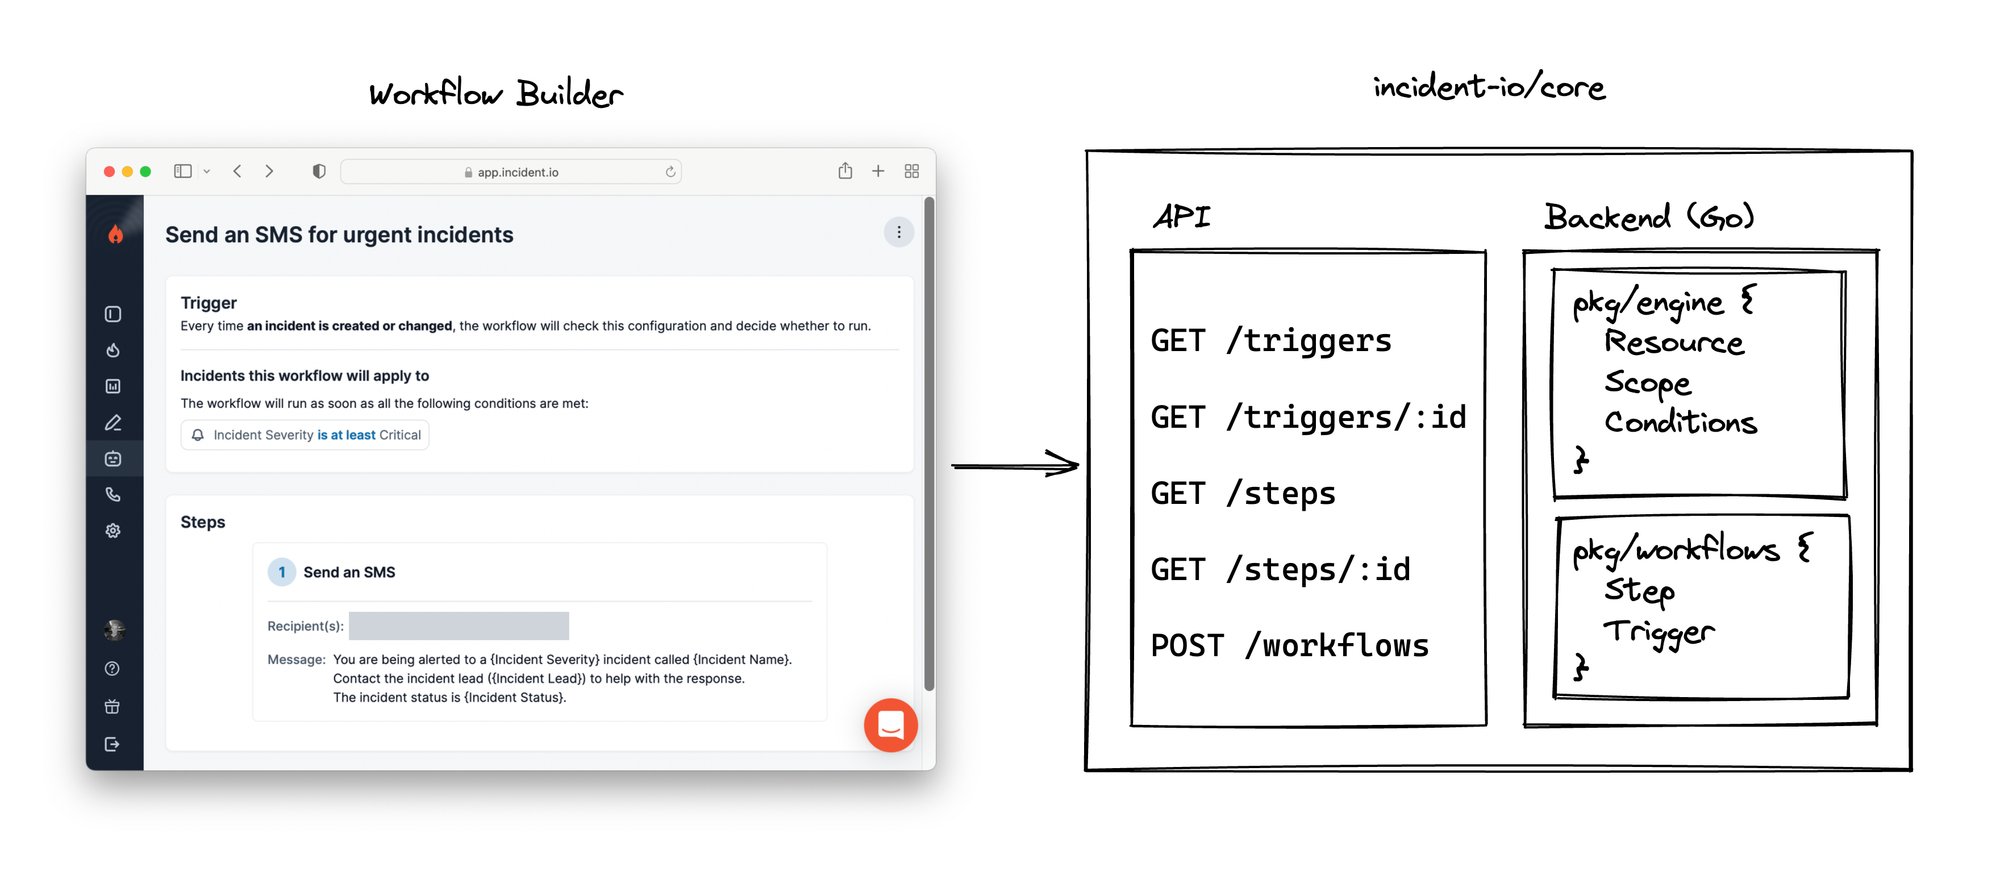
Each of these concepts is implemented in our backend, and expose information about themselves via a HTTP API, which the Workflow Builder uses to power the UI. In the programming language analogy, you can see the Workflow Builder as the IDE.
We’re going to explain this bottom-up, starting with the underlying concepts like resources and triggers, then break down how the Workflow Builder can use the information exposed by the API to construct valid workflow configurations.
Code structure
As we’re about to look at how we implement these concepts, it’s useful to understand how the backend code is structured.
Where possible, we group concepts by type (trigger, step, resource) where its implementation need know nothing about any other type: as an example, no resource implementation ever deals with steps or triggers, and no workflow step ever knows about the concept of a trigger.
That separation helps reduce complexity around common developer tasks (eg. adding a workflow step, trigger, or resource) by removing the need to interact with the broader workflow system. Instead, developers implement simple building blocks that they register with the rest of the system, making them available for use.
Written in Go, the backend splits into several packages:
pkg/engine, which provides core types and implements condition evaluationpkg/engine/resources, every entity a workflow might interact with (Slack channel, incident, user) must implement anengine.Resourceinterface inside this packagepkg/workflows, providing a service that listens for triggers and will execute workflowspkg/workflows/triggers, all triggers (incident created, updated, etc) must implement aTriggerinterface and register themselves in this packagepkg/workflows/steps, all steps (send Slack message, escalate to PagerDuty, etc) must implement aStepinterface and register themselves
The package structure clearly reflects that separation, and each of a ‘thing’ (be it trigger, step or resource) is implemented in a single file within that package.
It’s also worth noting that we separate workflow code from the underlying engine. That’s because the engine, with its resources and condition evaluation, is not specific to workflows.
This separation helps clarify how each concept relates to the other, and – through encouraging clear boundaries – allows us to reuse engine constructs across our app, powering things like conditional incident settings or rules for auto-archiving incidents.
Let’s start by looking at resources.
Resources
Resources represent the variable types available in the workflow program.
We have 40+ resources in our engine, of which examples are:
ResourceBool, representing a true or false valueResourceIncident, uniquely identifying an incident in an incident.io accountResourcePagerDutyService, for a service configured in the customers’ linked PagerDuty account
As different customers (organisations, in our codebase) can customise their configuration, such as making their own custom fields (which themselves can be different types, like option, numeric, link, etc) then building a full type-universe of resources must be done at runtime, when we can query the organisation settings to know what to build.
Resources implement a common interface, where the most important methods are:
Type, returning a string that uniquely identifies this type for the current organisationBuild, which knows how to instantiate a resource of this type from a single string value, such as a database IDFormFieldConfig, specifying how this resource should be displayed and input in the Workflow Builder frontendEnumerate, which returns all possible values for this resource, used to power type-aheads and drop-downs
Here’s an example of the ResourceNumber implementation, which helps model arbitrary numbers in workflow programs, such as “Number of open actions”:
package engineresources

// Stores all resources, registered against their unique Type() name.
var registry []Resource

// Below implements and registers a number resource to the package registry.
//
// This would be written in:
// engine/resources/resource_number.go
func init() {
	RegisterResource(func(ctx context.Context, db *gorm.DB, org *domain.Organisation) ([]Resource, error) {
		return []Resource{
			ResourceNumber{},
		}, nil
	})
}

// ResourceNumber implements the Resource interface.
type ResourceNumber struct {
	value *float64
}

// Type uniquely identifies this resource type.
func (ResourceNumber) Type() string {
	return "Number"
}

// FormFieldConfig helps the Workflow Builder represent resources of this
// type, and build inputs for them.
func (ResourceNumber) FormFieldConfig() FormFieldConfig {
	return FormFieldConfig{
		Type:        domain.FormFieldSingleTypeTextNumberInput,
		ArrayType:   domain.FormFieldArrayTypeNone,
		Icon:        domain.FormFieldIconNumber,
		Placeholder: "e.g. 123",
	}
}

// Build can instantiate a ResourceNumber from a string of the number,
// for example "123.45".
func (res ResourceNumber) Build(ctx context.Context, db *gorm.DB, org *domain.Organisation, reg *Registry, value *string) (Resource, error) {
	if value != nil {
		valueNumber, err := strconv.ParseFloat(*value, 64)
		if err != nil {
			return nil, errors.Wrap(err, "parsing number resource")
		}

		res.value = &valueNumber
	}

	return res, nil
}
All resources implement these methods, which would allow them to be instantiated and used when executing workflow steps.
But resources aren’t just for use in workflow steps: customers also want to build conditions into their workflow that can be used to decide if a workflow should be run. An example might be a workflow that sends a reminder to complete outstanding actions, but “only if number outstanding actions > 0”.
Resources that can be used in conditions implement an additional interface, called ResourceFilterable:
// ResourceFilterable is implemented by resources that are permitted
// to appear in condition operations parameters. These resources expose
// form field config and filter operations, to help build those forms.
type ResourceFilterable interface {
	Resource

	Operations() []*Method // operations that can be called on this resource
}

// Method is a named function that can be applied on a resource.
type Method struct {
	// Name is a machine readable name for the filter, eg. OperationEqual
	Name string
	// Label is the human readable name for the filter, eg. "is equal to"
	Label string
	// Params is what we pass to the operation
	Params []Param
	// Pointer is the function that we call for this operation
	Pointer FunctionPointer
}

type FunctionPointer reflect.Value
An operation maps to a method on the resource struct, which must:
- Have a return type of
bool, error - Receive parameters that are all
engine.Resourcetypes, i.e.ResourceNumberorResourceBool
In this sense, these methods aren’t arbitrary Go methods, they’re workflow-engine functions as they deal entirely in variables constructed of engine types. This allows us to understand each operation in terms of the engine type-system, which we’ll later use to (1) type-check workflow conditions and (2) dynamically construct the form to build conditions from what we know each operation expects.
We want to be able to use ResourceNumber in workflow conditions, and here’s an (incomplete) copy of the implementation:
func (res ResourceNumber) Operations() []*Method {
	return []*Method{
		{
			Name:    "eq",
			Label:   "is equal to",
			Pointer: MethodPointer(res, "OperationEqual"),
			Params: []Param{
				{
					Name:  "this",
					Type:  "Number",
					Label: "this",
				},
			},
		},
		{
			Name:    "gte",
			Label:   "is greater or equal to",
			Pointer: MethodPointer(res, "OperationGreaterThanOrEqual"),
			Params: []Param{
				{
					Name:  "this",
					Type:  "Number",
					Label: "this",
				},
			},
		},
	}
}

func (res ResourceNumber) OperationEqual(this ResourceNumber) bool {
	return res.value != nil && this.value != nil && *res.value == *this.value
}

func (res ResourceNumber) OperationGreaterThanOrEqual(this ResourceNumber) bool {
	return res.value != nil && this.value != nil && *res.value >= *this.value
}
Implementing these operations means the Workflow Builder knows, for number resources, that building equality and greater-than-or-equal conditions is possible.
And in addition, that both these conditions require a single number parameter, which means it can use ResourceNumber’s FormFieldConfig to build inputs for those parameters: which we’ll see in action later, when looking at the Workflow Builder.
Steps
We’ve seen how the engine language uses resources as its type-system, and how resources can implement engine-operation methods that can power workflow conditions.
Once you’ve built resources for a workflow and checked conditions against them, we’ll want to run the workflow steps using those resources to actually execute the workflow (escalate to PagerDuty, send a reminder, etc).
As with resources, each workflow step implements a common interface, and registers itself with a global registry of steps.
The interface is simple, and can be seen as a wrapper round a function operating on engine resource types, along with providing the metadata required to represent the step in the frontend builder:
package workflows

// Step is an action that may be taken by a workflow. Each step is
// named, and performs a specific process, sometimes parameterised by
// values taken from the scope.
type Step interface {
	// Name uniquely identifies the step (slack.send_message)
	Name() string
	// Label is a human-readable identifier (Send Slack message)
	Label() string
	// Description is a human-readable explanation of the step
	Description() string
	// Params describe the parameter types expected by the Runner function
	Params() []engineresources.Param
	// Runner generates a runner function which will receive the
	// parameters the Step advertises that it requires.
	Runner(
		context.Context, *gorm.DB,
		*domain.Organisation, engineresources.Scope, *domain.WorkflowRun) any
}
An example step is “Send an SMS”, which customers can use to send text messages to a collection of recipients, useful if you want immediate updates on new incidents.
func init() {
	register(func() workflows.Step {
		return &StepPhoneSMS{}
	})
}

type StepPhoneSMS struct {
}

func (StepPhoneSMS) Name() string {
	return "phone.sms"
}

func (StepPhoneSMS) Label() string {
	return "Send an SMS"
}

func (StepPhoneSMS) Description() string {
	return "Send a templated SMS message."
}

func (StepPhoneSMS) Params() []engineresources.Param {
	return []engineresources.Param{
		{
			Name:        "recipients",
			Label:       "Recipient(s)",
			Description: "Which phone number(s) to message? eg. +44 113 496 0000",
			Type:        "String",
			Array:       true,
		},
		{
			Name:        "message",
			Label:       "Message",
			Description: "What should the message be?",
			Type:        "Text",
		},
	}
}

func (step StepPhoneSMS) Runner(ctx context.Context, db *gorm.DB, org *domain.Organisation, scope engineresources.Scope, workflowRun *domain.WorkflowRun) any {
	return func(recipients []engineresources.ResourceString, message engineresources.ResourceText) error {
		interpolatedMessage := fmt.Sprintf("%s\n\nSent by incident.io",
			engineresources.Interpolate(message, scope))

		for _, recipient := range recipients {
			log.Info(ctx, "Sending message", map[string]any{
				"recipient": *recipient.Value(),
			})

			err := sms.SendMessage(sms.Message{
				To: *recipient.Value(),
				Body: interpolatedMessage,
			})
			if err != nil {
				return err
			}
		}

		return nil
	}
}
Take a moment to read that implementation. It might seem like a lot just to send an SMS message, but adding this file:
- Makes the step available to use in the Workflow Builder (we’ll see this later), providing human-readable label and descriptions in the UI
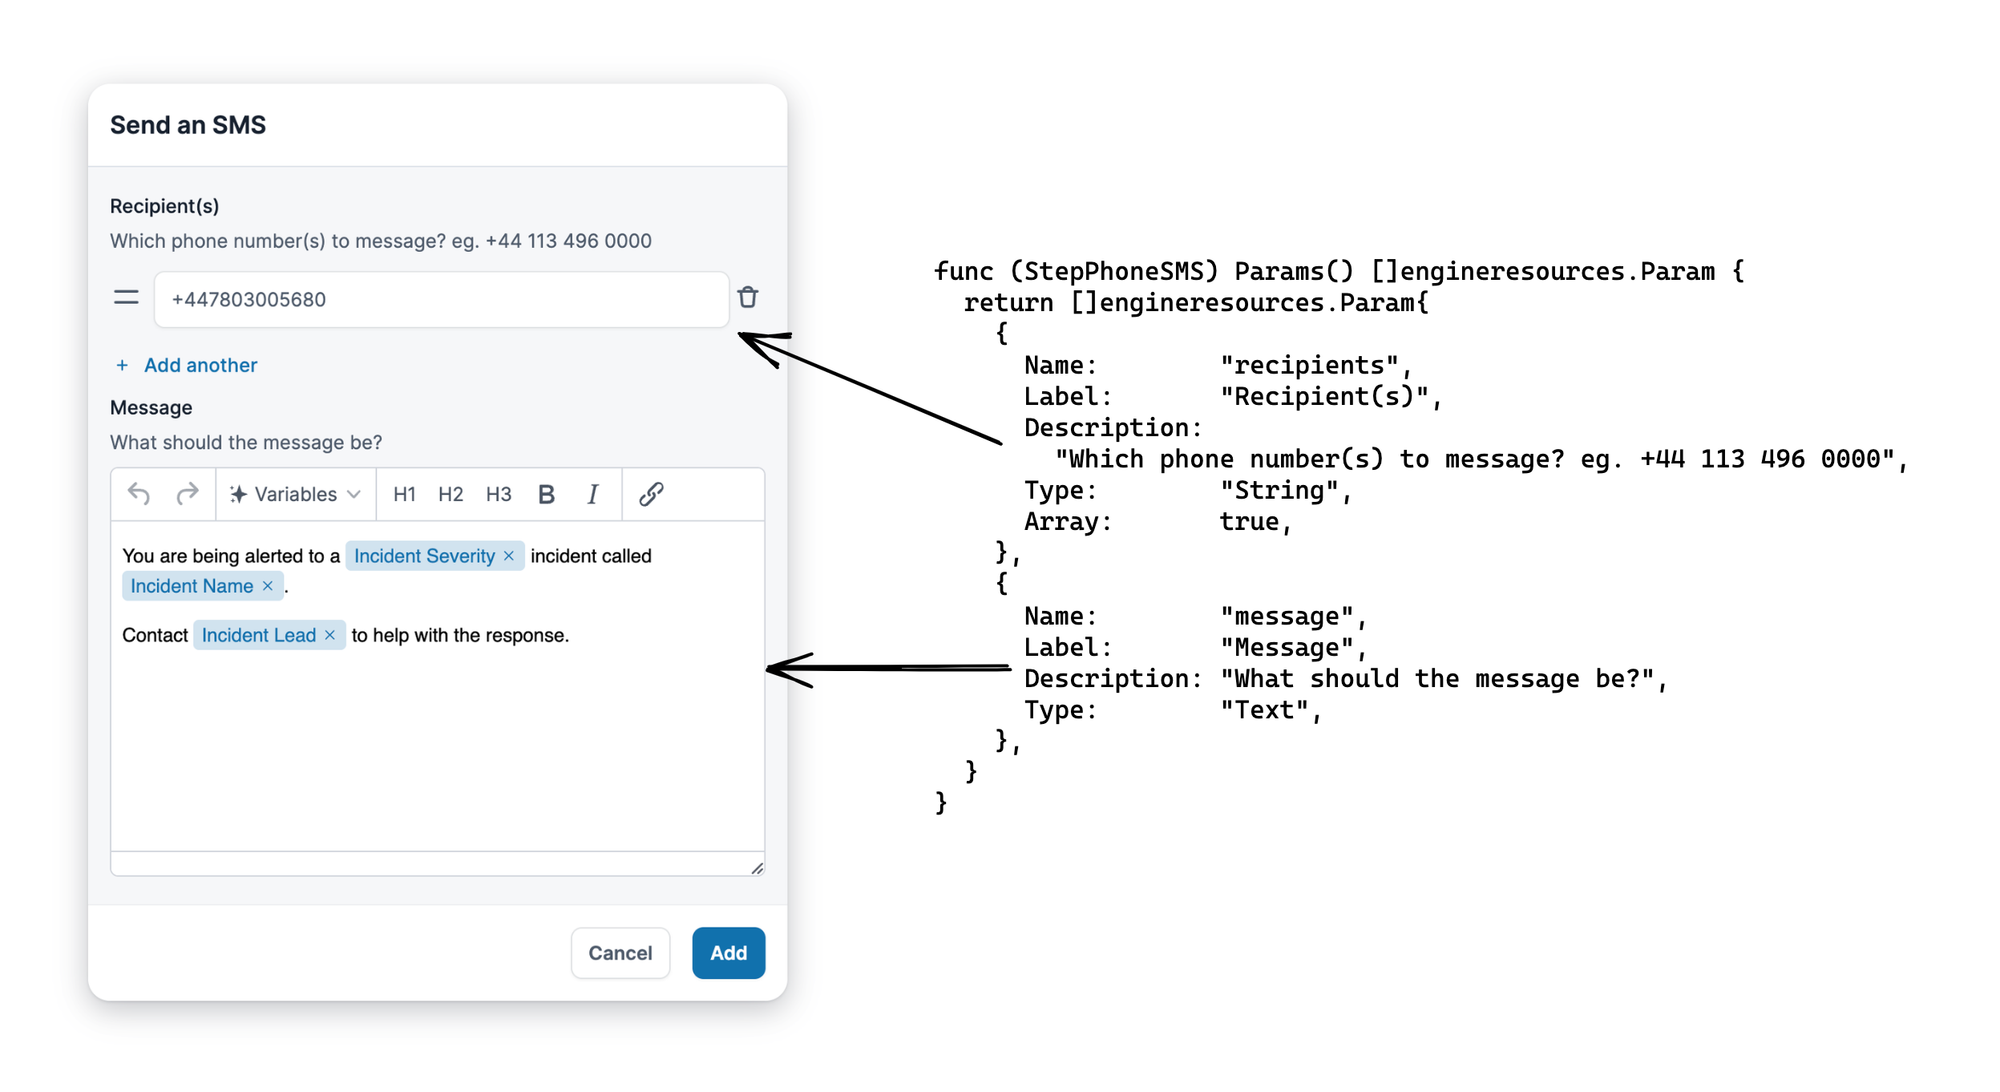
- Statically types the SMS function via the Param() method, helping dynamically build forms that configure steps in the Workflow Builder, and to type-check workflows that use the step before we store them in the database
Without any other code, this step becomes available in the workflow builder, where we render a form that can collect recipients (String array) and message (general Text):
Triggers
The final piece of workflows is how we instantiate the resources which workflow conditions can apply to, and what we provide as parameters to workflow steps on execution.
This part is quite simple, in that we define a trigger like “incident updated” with a BuildScope method that can generate a list of named resources (references, which are like variables in a computer program) associated with that trigger.
It looks like this:
// pkg/workflows/triggers/trigger_incident_updated.go
func init() {
	RegisterTrigger(func() Trigger { return &TriggerIncidentUpdated{} })
}

type TriggerIncidentUpdated struct {
	IncidentID string
}

func (t TriggerIncidentUpdated) Name() string {
	return "incident.updated"
}

func (t TriggerIncidentUpdated) Label() string {
	return "When an incident is created or changed"
}

func (t TriggerIncidentUpdated) BuildScope(ctx context.Context, db *gorm.DB, org *domain.Organisation, reg *engineresources.Registry) (engineresources.Scope, error) {
	var incidentID *string
	if t.IncidentID != "" {
		incidentID = &t.IncidentID
	}

	incidentResource, err := reg.Build(ctx, "Incident", db, org, reg, incidentID)
	if err != nil {
		return nil, err
	}

	scope := engineresources.Scope{
		&engineresources.Reference{
			Name:     "incident",
			Label:    "Incident",
			Resource: incidentResource,
		},
	}

	return scope, nil
}
We can use BuildScope to understand the resources that each trigger provides, which we’ll use in the Workflow Builder to understand what is available for use in conditions and steps, and when we validate workflows to ensure our references are valid.
Workflow Builder, an IDE
At this point, we’ve covered resources, conditions, steps and triggers, explaining their purpose and looking at the code that implements them.
Now we can take a look at how the Workflow Builder can use those implementations to build workflow configuration by mixing these concepts together.
Let’s take a journey through creating a workflow using the builder, diving into how the frontend uses data from the API to dynamically render the right forms.
Select a trigger
Workflows are always associated with a single trigger, and picking the trigger is the first step of creating a new workflow.
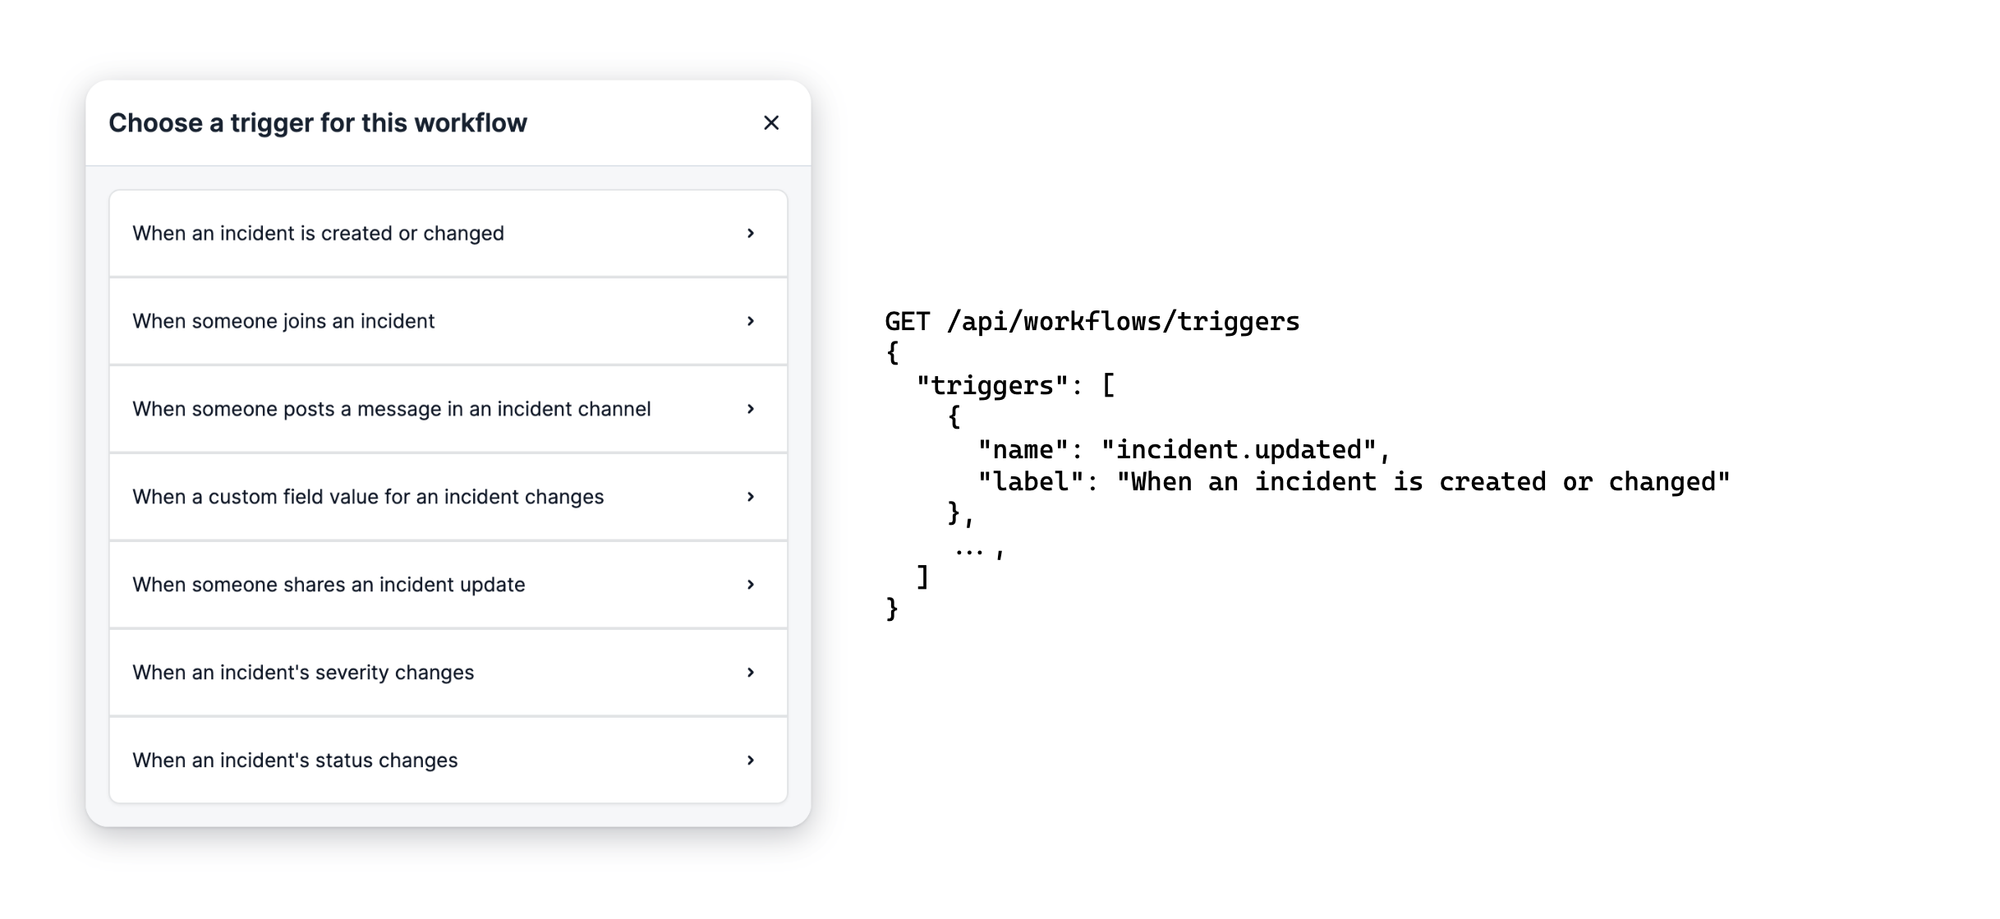
In a simple example of the Workflow Builder being able to introspect into the workflow implementation, the list of triggers is produced from a GET /triggers API, where triggers appear as soon as they are Register'ed in the workflows/triggers package.
Inspecting a trigger
Once selected, we can GET /triggers/:id for detail about the resources that are available when the trigger is fired (what we’ll call the trigger scope) and cross-reference that with the resource definitions to understand how to use each scope variable.
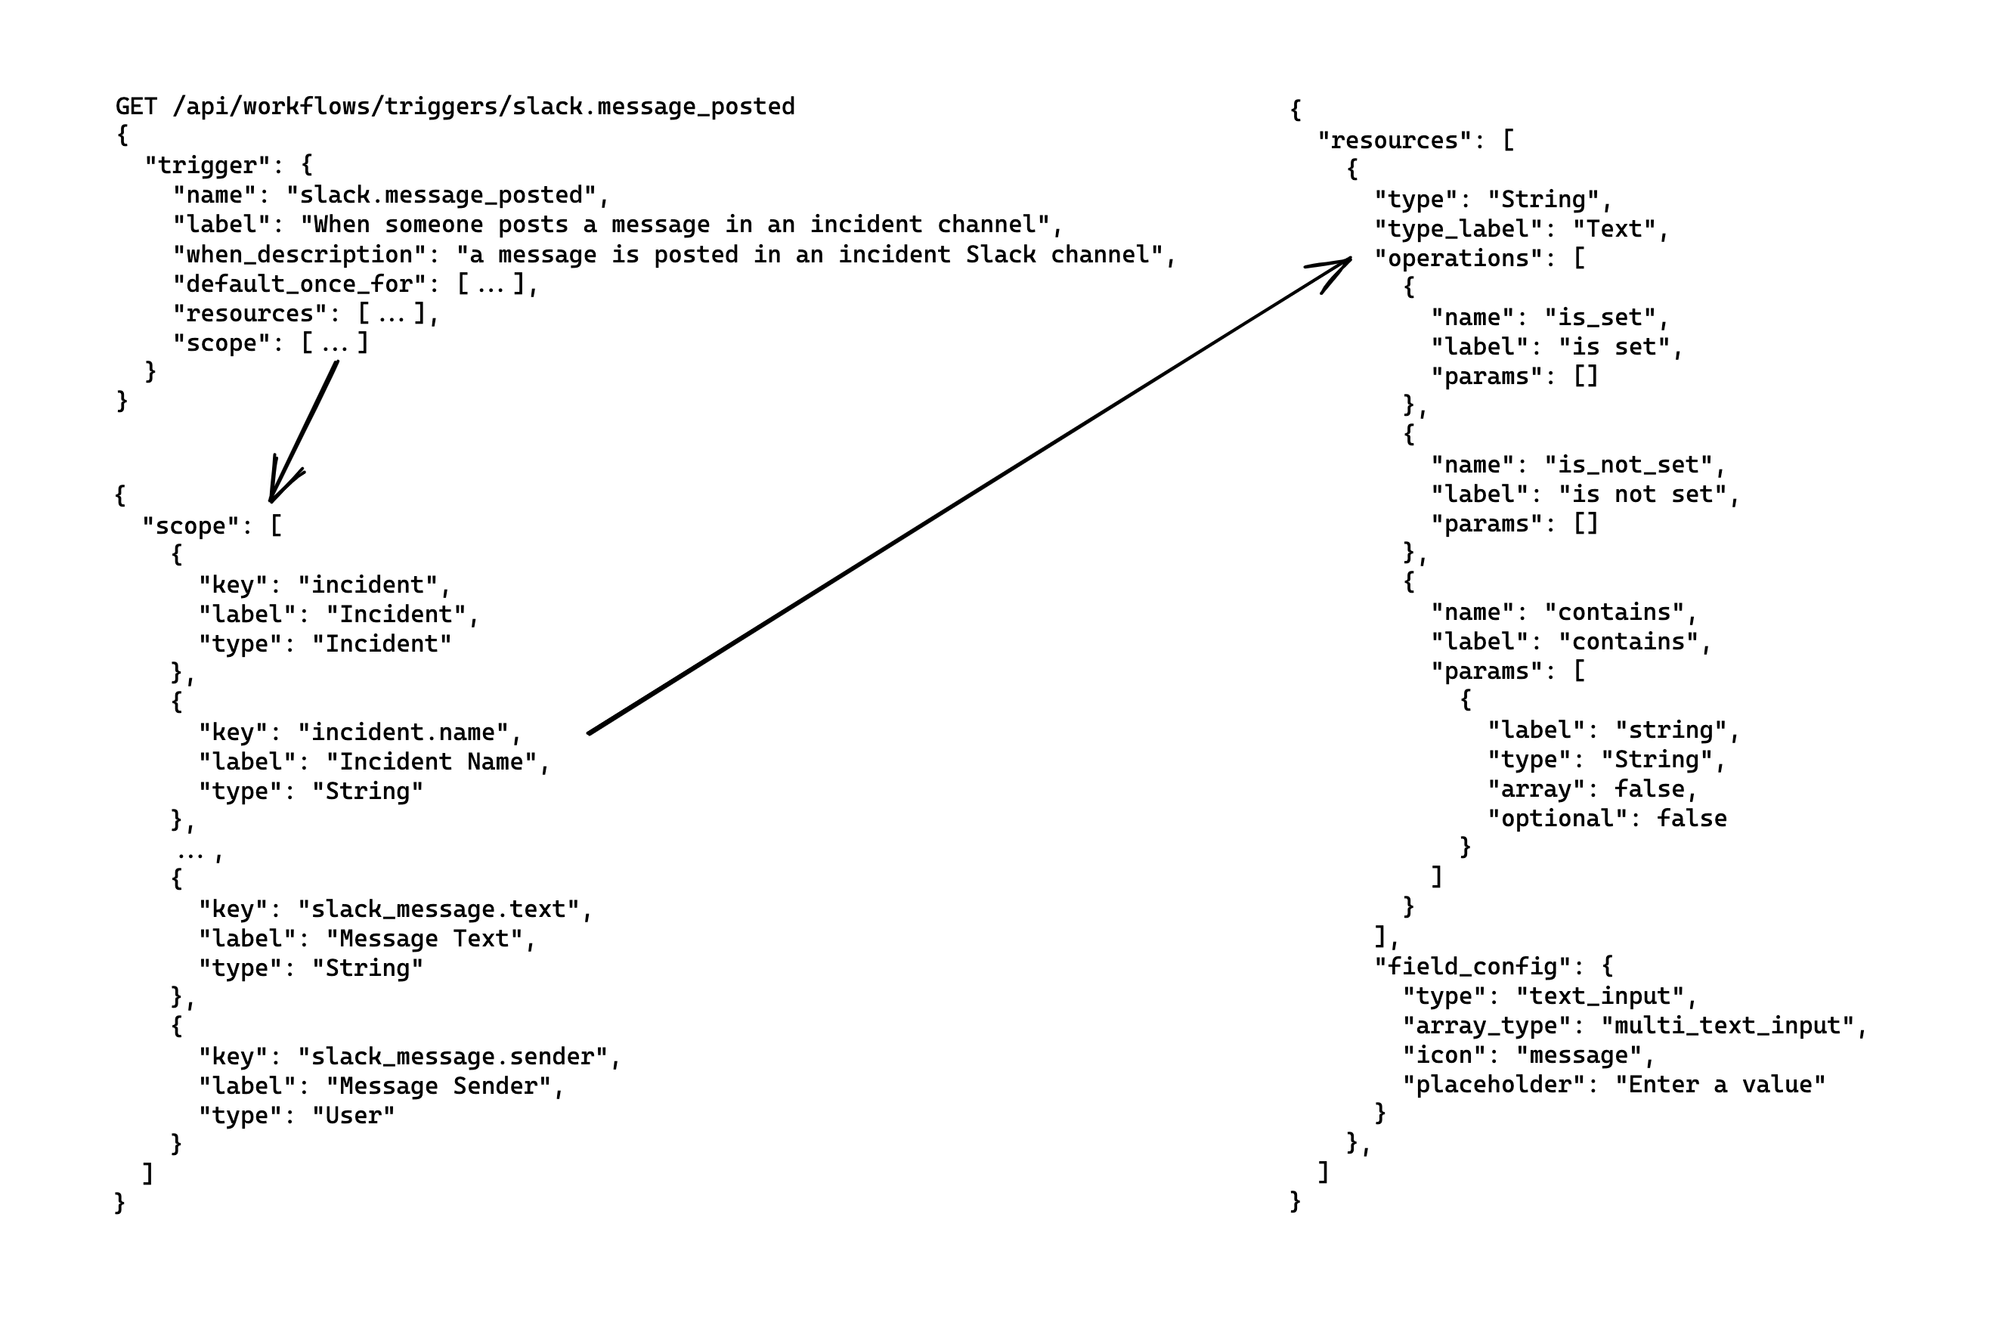
The example shows how for a slack.message_posted trigger, which fires whenever a Slack message is posted in an incident channel, our workflow will have access to incident resources such as the:
- Incident name, as
incident.nameofStringtype - Slack message that was posted, both the:
- Message content as
slack_message.text, typeString - Message sender as
slack_message.sender, typeUser, referencing a user in the incident.io system
- Message content as
Building conditions
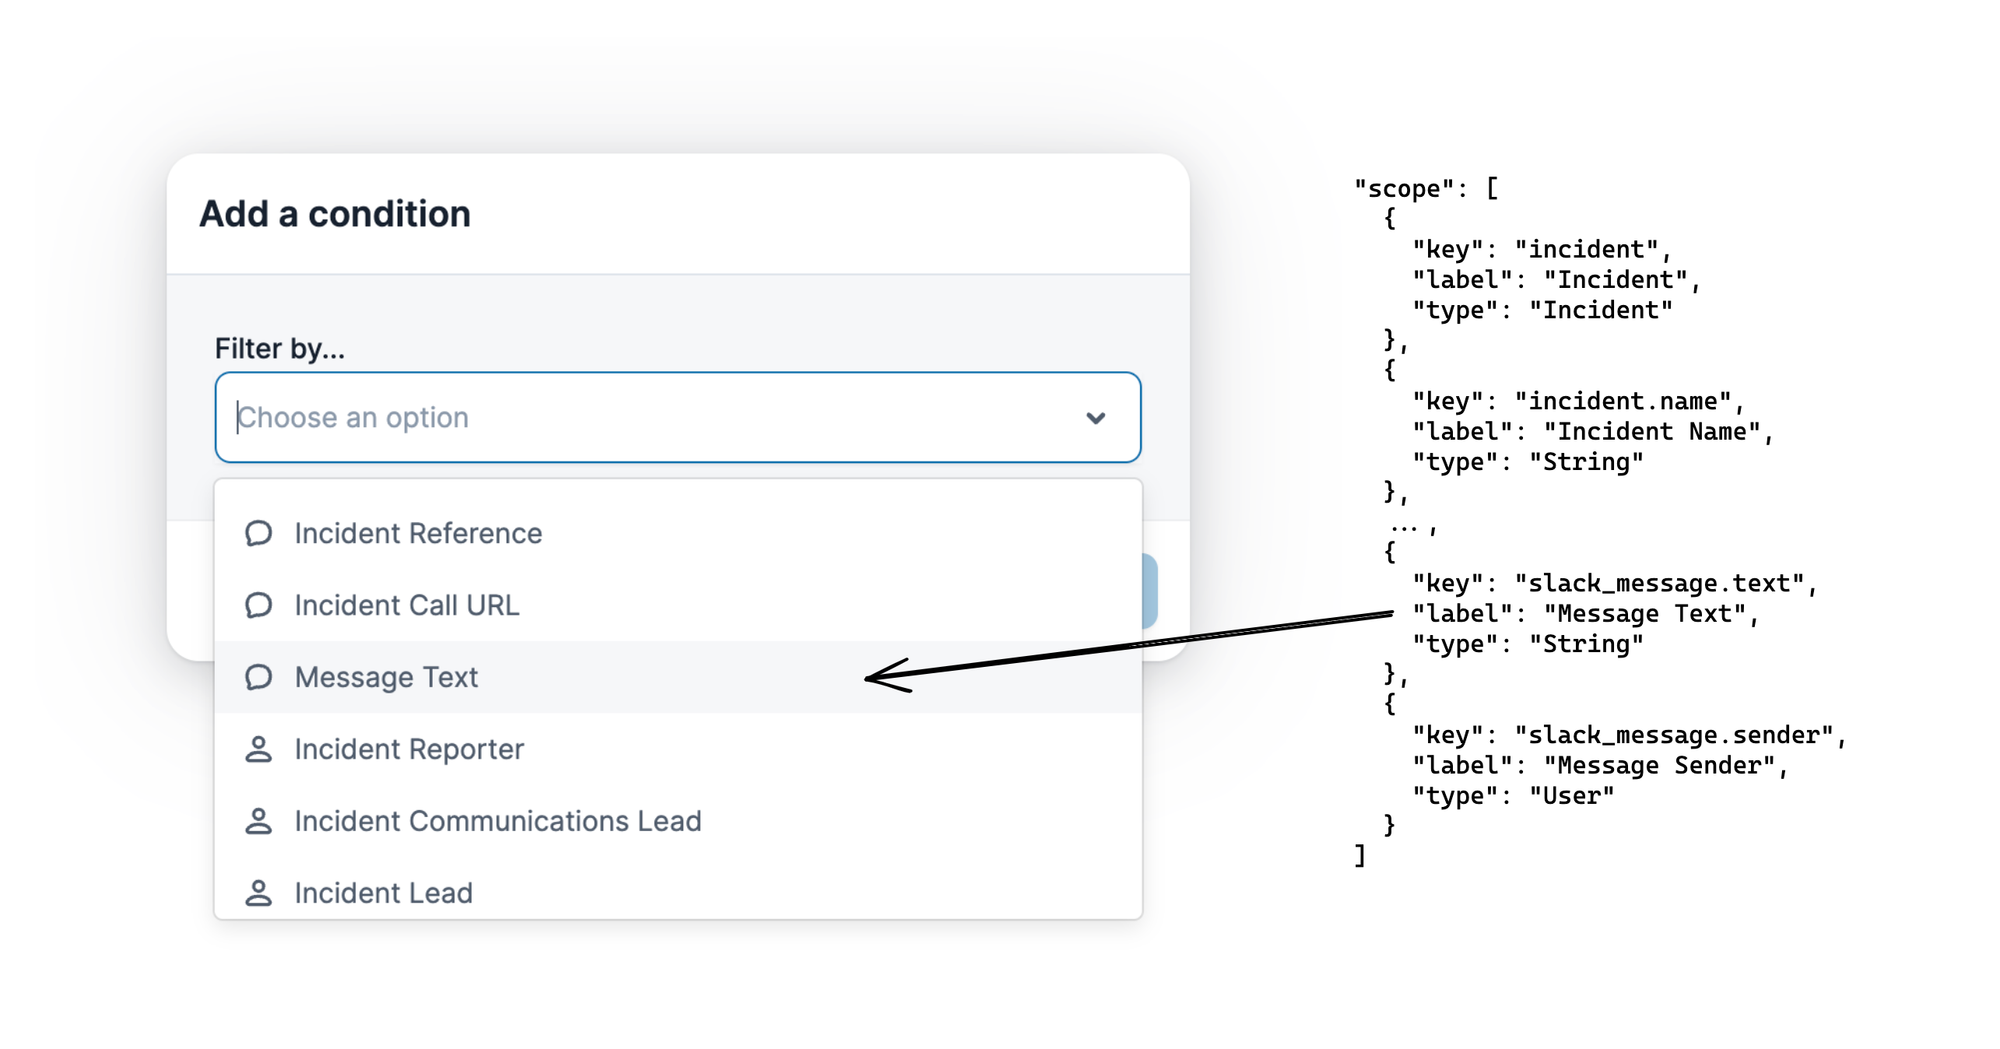
Workflow conditions are built from resources in the trigger scope, and we can use the result of inspecting the trigger to power the condition builder.
When adding a condition to a workflow, the first step is to pick a resource on which to build the condition: we can populate that drop-down with any scope resources that support operations, such as String resources.
Once selected, we can use the type of the scope reference to find an entry in the trigger resources field, which provides information about what operations are available for this type.
This allows us to provide a selection of operations for the condition, and once selected, any inputs required for parameters to the operation.
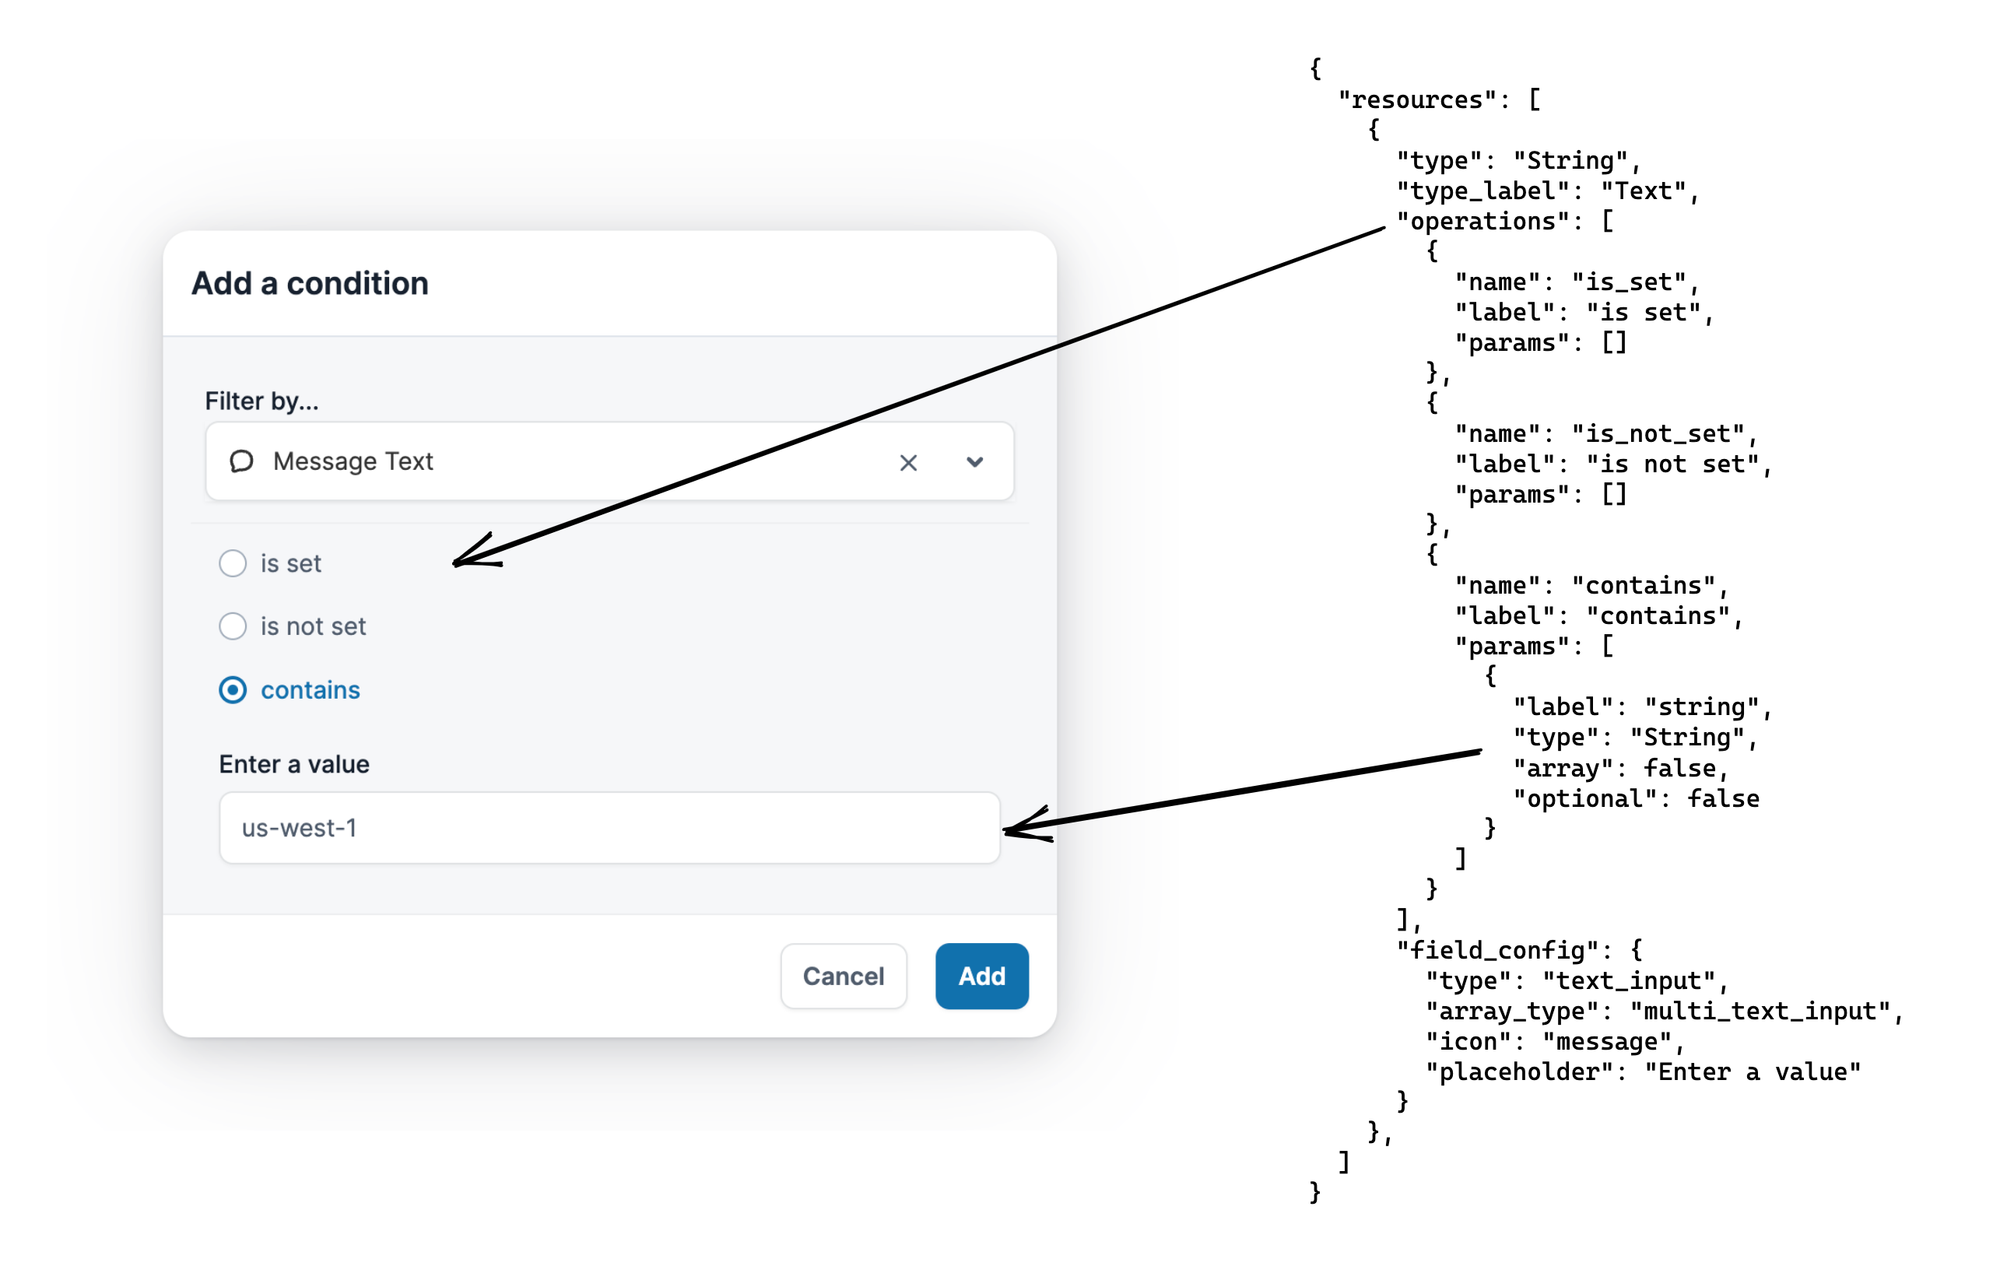
As Message Text is a String resource, we can use the resource data to see:
- String offers three operations: is set, is not set, and contains
- Contains is an operation that has a single parameter, of resource type String
- From the
field_configof String, the input type is atext_input
Together, this is how the frontend knows to render the radio buttons for each operation, and when contains is selected, the single text input for the operation parameter.
Configuring steps
Now we’ve picked our trigger and chosen the conditions that should apply for the workflow to run, all that remains is configuring steps, telling us what the workflow should actually do.
We’ve already seen the implementation of StepPhoneSMS, and the API uses that implementation to provide information about the step, including the parameters (and the types of those parameters) that it needs to run:

Sending an SMS requires a list of recipients and a message: that means an array of String for the former, and a Text type for the latter, where Text supports multiline input with interpolation of other variables. As an aside, we don’t support custom validations for these inputs yet: it’s something we deferred until it became a problem, and it hasn’t yet become one!
Now we have the types, all the frontend needs to do is generate a modal form with those input types, using the parameter details like label and description to construct the UI. This can be done generically for all steps, allowing us to avoid ever writing a “SendSMS” frontend component, or having to change any frontend at all if we implement a new step in the backend.
Being able to dynamically render the frontend is a huge win for developer productivity, as it makes building new steps incredibly simple, along with reducing the chance of introducing bugs. But even ignoring those advantages, there are other reasons we benefit from modelling workflows like this, especially around the user experience of building workflows.
Until now, we’ve dealt only with simple input types like String or Text resources. But the power of abstracting resource types becomes more obvious with more complex examples, one such example being the User resource.
Let’s look at the Send Slack message step, which receives a list of users to directly message.
As before, the message is Text, which means we’ll get the multiline input. But what about the first parameter, which is expecting an array of Users?
The input we’ll use for this can be found in the form field config of the User resource, which specifies the input type as multi_dynamic_select. This means a multi-select user dropdown, but begs the question of what options we will provide in that dropdown.
The answer is a combination of two sources: the first being our trigger scope, and the second being options which we source from a resource-generic endpoint.
Because we know the recipients parameter is an array of Users, we can provide - as options in the dropdown - any resource references from the trigger scope that are of User type. This is what allows us to provide Incident Reporter, Incident Lead and Message Sender: they are User values associated with the Slack message posted trigger.
These values, if chosen, will be resolved at workflow execution. This allows us to build really interesting workflows: as an example using the Slack message posted trigger, we could build a workflow to direct message the original message author if their message contains specific words like “data breach”, perhaps warning them to notify their organisation’s DPO.
That’s just one possibility, but the flexibility of combining any specific trigger with any of our steps means customers keep building workflows that we never even thought of, without any prompting on our behalf.
Trigger options demonstrate dynamic input, but maybe you want to send a message to a specific person, rather than a user that is contextual to a specific workflow run? For this, we add to the dropdown all other users that exist in this customers account, loaded from a generic typeahead API endpoint that is supported for all resources that implement the Enumerate method.
This type of intelligence and flexibility is a huge benefit to statically typing all parts of the engine, and is why our workflow product is so well received by customers. Not only does it allow building an interface that non-technical users are comfortable working with, but it also means building new steps or triggers is extremely quick, easy, and error-free.

Lawrence Jones
Product Engineer
See related articles

We rebuilt our post-mortems from the ground up
Today we're launching our new post-mortems experience, and I want to walk you through what we've done and why.
 Pete Hamilton
March 17, 2026

Bloom filters: the niche trick behind a 16× faster API
This post is a deep dive into how we improved the P95 latency of an API endpoint from 5s to 0.3s using a niche little computer science trick called a bloom filter.
 Mike Fisher
November 14, 2025

My first three months at incident.io
Hear from Edd - one of our recent joiners in the On-Call team - how have they found their first three months and what's it been like working here.
 Edd Sowden
September 1, 2025
So good, you’ll break things on purpose
Ready for modern incident management? Book a call with one of our experts today.
We’d love to talk to you about
- All-in-one incident management
- Our unmatched speed of deployment
- Why we’re loved by users and easily adopted
- How we work for the whole organization


