Taking the fear out of migrations

Over the last 18 months at incident.io, we’ve done a lot of migrations. Often, a new feature requires a change to our existing data model. For us to be successful, it’s important that we can smoothly transition from the old world to the new as quickly as we can.
There are few things in software where I’d advocate a ‘one true way,’ but the closest I come is probably migrations. There’s a playbook that we follow to give us the best odds of a smooth switchover:
- Make the new data models
- Write to both the old and the new model
- Start reading from the new model
- Drop the old data model
A worked example
Last year we introduced customisable incident statuses.
Before that, our statuses were hard coded as strings (investigating, fixing, monitoring, closed). There was a database column status which, for each incident, contained one of those 4 strings.
We wanted to move to a world where customers could choose their own statuses, both renaming them and choosing how many they wanted.
So how did we do this?
Step #1: Make the new data models
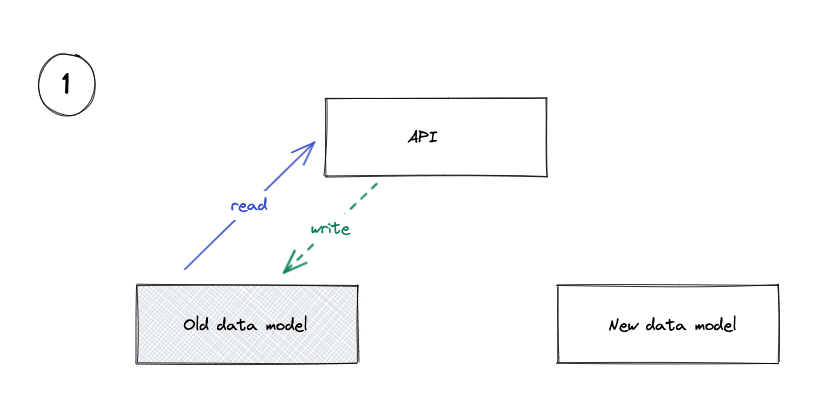
We’ve got to agree on the target data model: what the new world will look like. We need a new table to represent the statuses configured against each organization: incident_statuses, and a column on our incidents table to store which status it’s currently in: incident_status_id.
Migrating is going to take us some time, so we’d want to have fairly high confidence in the new model before we start work to avoid wasted effort.
public.incidents (
  id                 text not null
  organisation_id    text not null
  incident_status_id text not null
  ...
)

public.incident_statuses (
  id              text not null
  organisation_id text not null
  name            text not null
  description     text not null
)
At this point, we’d build out our data models by running migrations on the database, and representing the new model IncidentStatus in our codebase.
create table incident_statuses (
...
);

alter table incidents add column incident_status_id text not null references incident_statuses(id);
Step #2: Write to both the old and the new model
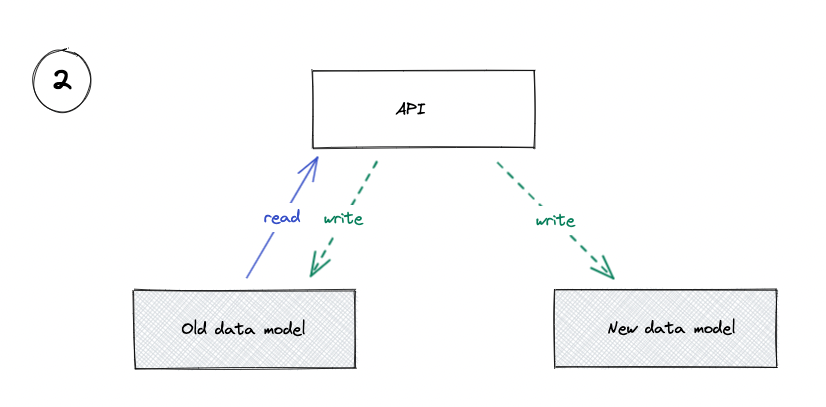
2.1: Backfill any dependent data models
This isn’t always necessary: it depends on the migration that you’re doing.
In our case, all our customers have a single configuration, currently represented in code (in an enum investigating, fixing, monitoring, closed). We can represent this configuration in our new incident_statuses table, by creating 4 rows for each organisation.
This is low risk: we can take our time to run the backfill, and verify that it’s worked as expected. Nothing is reading from this data yet, so it’s easy for us to change our minds (e.g. if we decide to change the descriptions of a particular status).
We need to do this first as we’ll be relying on foreign keys in our database—if these rows don’t exist, we can’t refer to them elsewhere.
It’s worth thinking about development environments here too, to make sure your colleagues’ local environments behave smoothly as expected.
2.2: Write to the new data model
Now that we’ve got a default configuration, we can use it to start writing new information into our new data model (alongside our old one). So now, when an incident changes status to fixing, we make two changes:
update incidents set status='fixing' where id='I123';

update incidents set incident_status_id = (
  select id from incident_statuses where name='Fixing'
) where id='I123';
This means that all incidents that are currently changing have an ‘up-to-date’ incident_status_id value. Again, this is low risk: we can take our time to verify that this is working as expected, and make changes here without causing production impact as nothing is reading from this column.
2.3: Backfill the existing data
Now that we’re writing to both the old and the new world, we can backfill all our existing incidents with an incident_status_id. We can go through each incident, find the corresponding incident_status, and update the column.
This is still low risk: again we can take whatever time we need to verify the results, and can run the backfill multiple times if we find that there’s a bug (provided you make your backfill rerunnable, which you definitely should!).
Step #3: Start reading smoothly from the new model
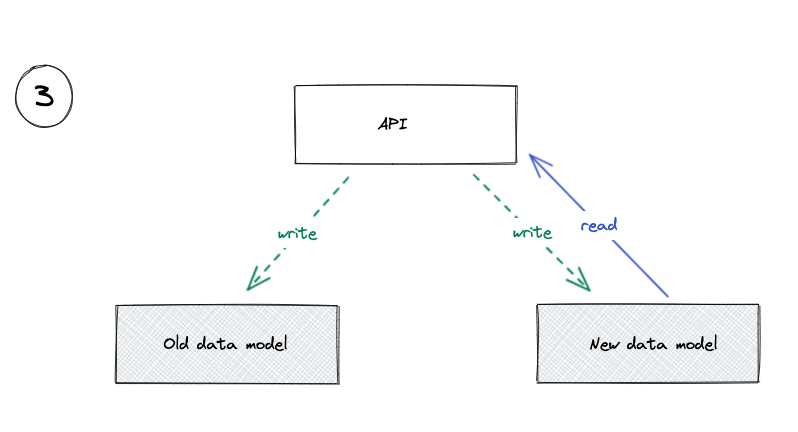
3.1: Read from both sources and compare
Depending on your risk appetite and the complexity of the change, you might be able to skip straight to the next step, or (at the other extreme) you might run this comparison for a number of weeks.
Now that all our data is represented in both the old and the new data model, we can start reading from both and check if they match. If we ever see them disagree, we can log an error that’ll be picked up by our alerting tools. We can run this code in production for as long as we need to gain confidence in our system.
In our case, we’d be reading incident.status and incident.incident_status_id and making sure they’re giving us the same answer.
3.2: Only read from the new model
Once you’re confident that your new model has the correct data, we can start using the new model as our ‘source of truth’. That means when someone asks us what status an incident is, we use incident.incident_status_id to tell us. When someone asks us to list all the statuses (e.g. to show in a dropdown), we look for all the incident_statuses owned by that organization.
This should be the scary moment: if your new model isn’t storing the right data, it’s going to start causing issues. But as we have been able to read-and-compare the new and the old model, we’ve got confidence that this is now safe.
This is a great opportunity to use a feature-flag—you’re still writing to both the old and the new models, so it’s easy to revert back to step five (via a feature flag) if you see any issues, without causing any service interruption.
Step #4: Drop the old data model
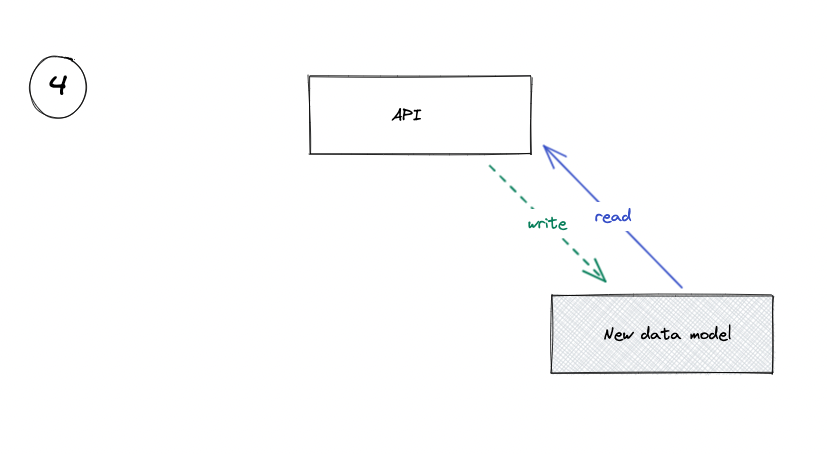
Step 4.1: Stop using the old data model
Once we’ve been reading from the new model for a while (again, the length of time depends on context), we can smoothly drop the old data model and the code that reads from it and writes to it.
This will also make our code feel simpler again: we can just read and write to the database like we normally would.
This is the first one-way door that we’re taking: once we stop writing to the old data model, we can’t easily go back. However, it doesn’t feel scary. We’ve not been using the old data model since step five, and nothing’s gone wrong (yet), so we should be good to go.
Step 4.2: Drop the old data model
Now there’s some columns in our database that we aren’t using, and we haven’t been for a while. We should drop them, so that our colleagues aren’t confused in the future.
This might have some interesting downstream implications: you should check your data pipelines to see if anything is relying on the columns!
If you’re feeling very risk averse you can always take a backup of the data you’re deleting: I’ve never used a backup like this but I’ve often taken them just in-case.
And…we’re done!
We’ve now got the new data model ready and raring to go, and all our existing APIs and UIs are working as expected, so the real fun can begin.
In our case, we’ve been doing this migration to enable new functionality: customers want to rename their incident statuses. Next up, we can focus on shipping the new feature without having to worry about our existing data or functionality.
This is where we’ll build new APIs and UIs that allow our users to create, edit and delete incident statuses. Because we’ve already got the new data model, and we’ve got confidence that it’s working, we don’t have to worry about the downstream impacts: we’re just letting customers make changes in the UI which we can already make directly in the database.
So, what are the advantages of this approach?
We frequently run migrations like this in half a day, as we continue to evolve our product. And while these all might sound like a lot of steps, once you’re doing it frequently, it’ll become second nature. That said, it’s a worthwhile process that has tons of advantages:
You never have to rush
You can get through this whole process without having to rush through a particular step. That means you don’t have to have a quick backfill that runs while you take your system down, and you don’t have to worry if a backfill doesn’t work first time.
Deployments are less intimidating
Migrating in this way means you can have a feature flag that controls whether your code is reading from the new model or the old model. That significantly derisks the switchover point: at the first sign of trouble you can flip the feature flag back to relying on the old data and start investigating. If the issue was unrelated, you can flip the flag again and you’re back using the new model.
It doesn’t have to take long
When you’re doing simple and low risk migrations, you can get through these steps very quickly (we frequently do this in a single day) provided you have an easy deployment path. The same process works just the same when you’re migrating millions of rows, or dealing with complex data structures - you just do a lot more waiting and a lot more checking.
You can efficiently parallelise effort
This is a pretty linear process: you’ll have to deploy each change one after another to gain confidence in the system. However, you can still parallelise the work - as soon as step 1 is complete, you can split up and start working on different chunks. A typical project for us might split into:
- Someone working on the two backfills
- Someone working on writing to the new data model
- Someone working on reading from the new data model
- Someone building the new functionality enabled by the new data model
🗣️ Confession: we don’t always do all of these steps. We try to choose ‘horses for courses’, and adapt our approach based on the context that we’re working in. For example, if we’re touching authentication, we’d do the more rigorous version, but if we’re changing a less important feature that’s not widely used, we’ll cut corners to optimise for pace.

See related articles

Bloom filters: the niche trick behind a 16× faster API
This post is a deep dive into how we improved the P95 latency of an API endpoint from 5s to 0.3s using a niche little computer science trick called a bloom filter.
 Mike Fisher
My first three months at incident.io
Hear from Edd - one of our recent joiners in the On-Call team - how have they found their first three months and what's it been like working here.
 Edd Sowden
Impact review: Scribe under the microscope
In this post we review the impact of our AI-powered transcription feature, Scribe, as we analyse key metrics, user behaviour, and feedback to drive future improvements.
 Kelsey Mills
So good, you’ll break things on purpose
Ready for modern incident management? Book a call with one of our experts today.
We’d love to talk to you about
- All-in-one incident management
- Our unmatched speed of deployment
- Why we’re loved by users and easily adopted
- How we work for the whole organization


